 DIY
DIY
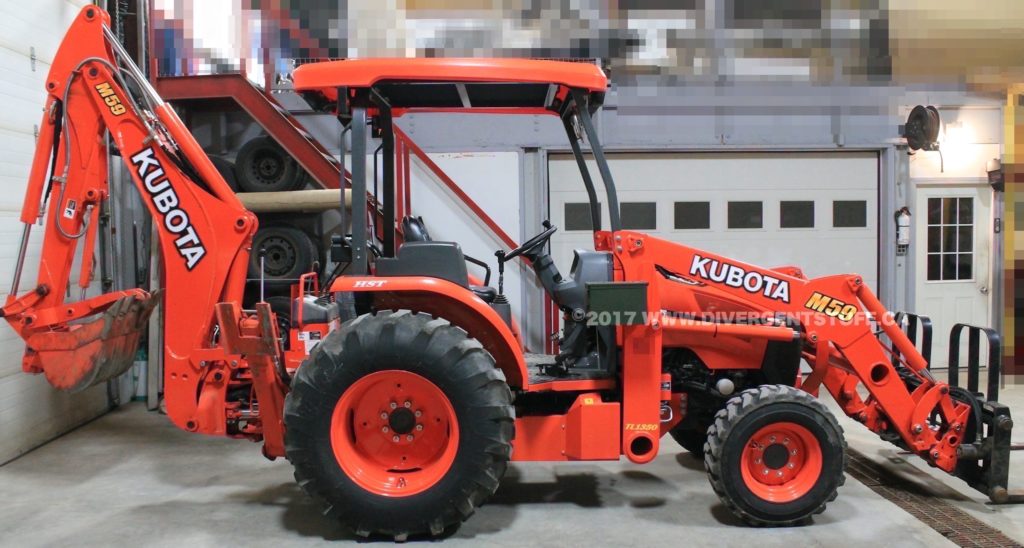
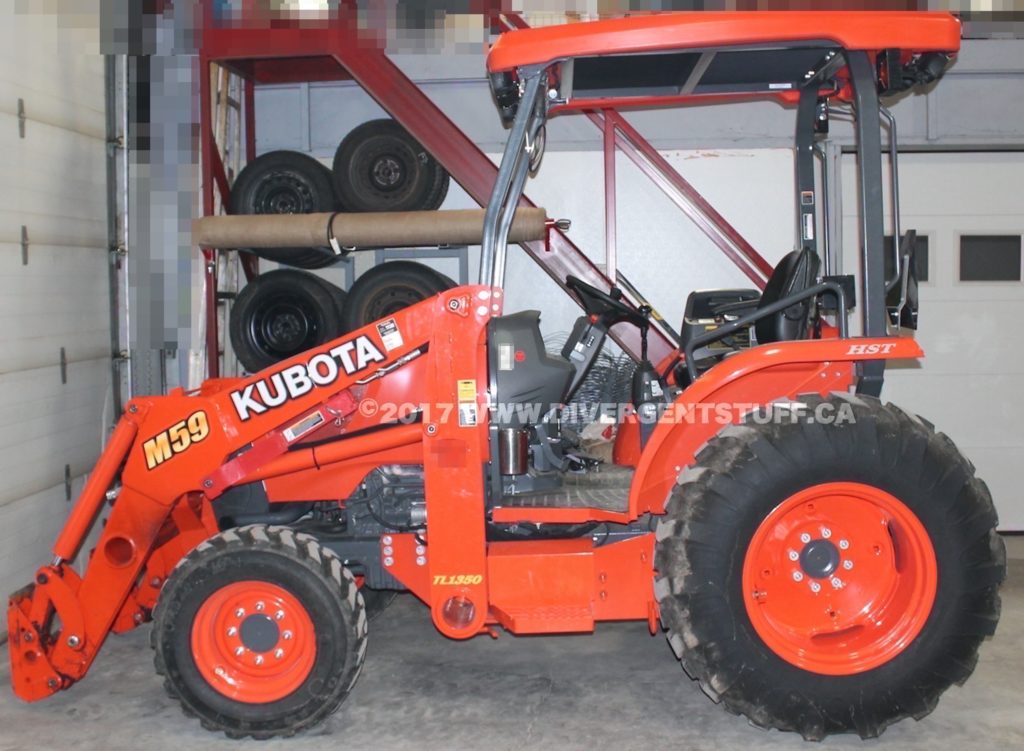
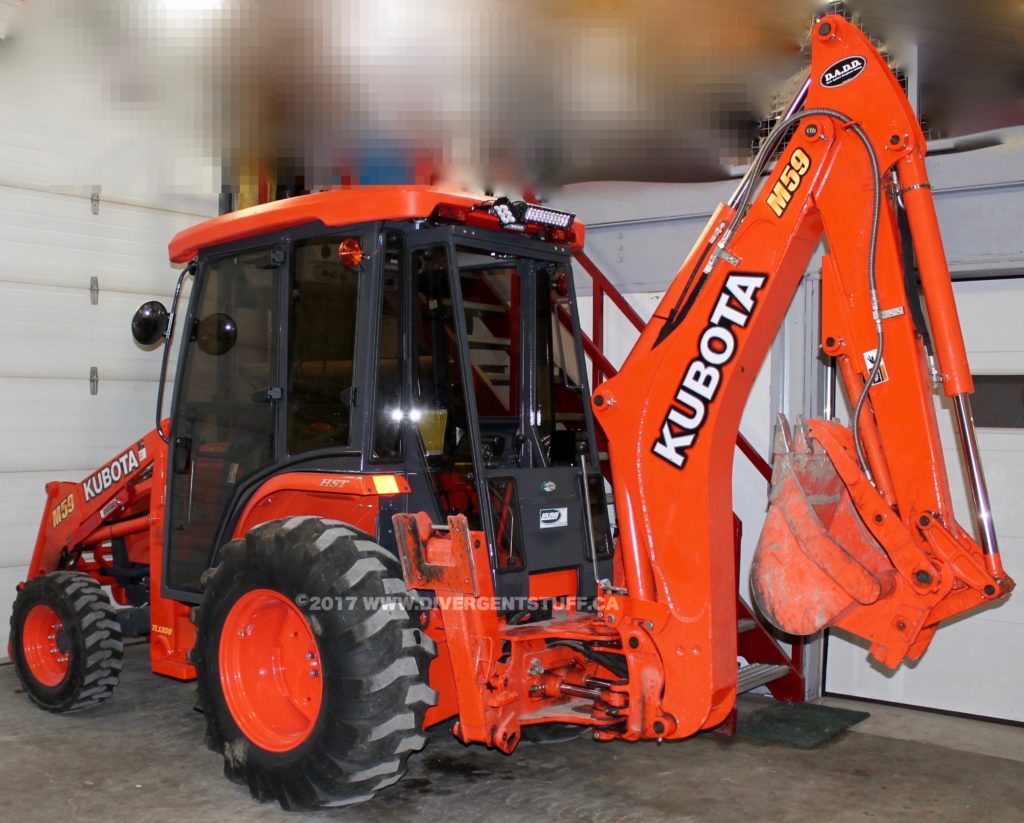
Laurin Eclipse Cab install for my Kubota M59
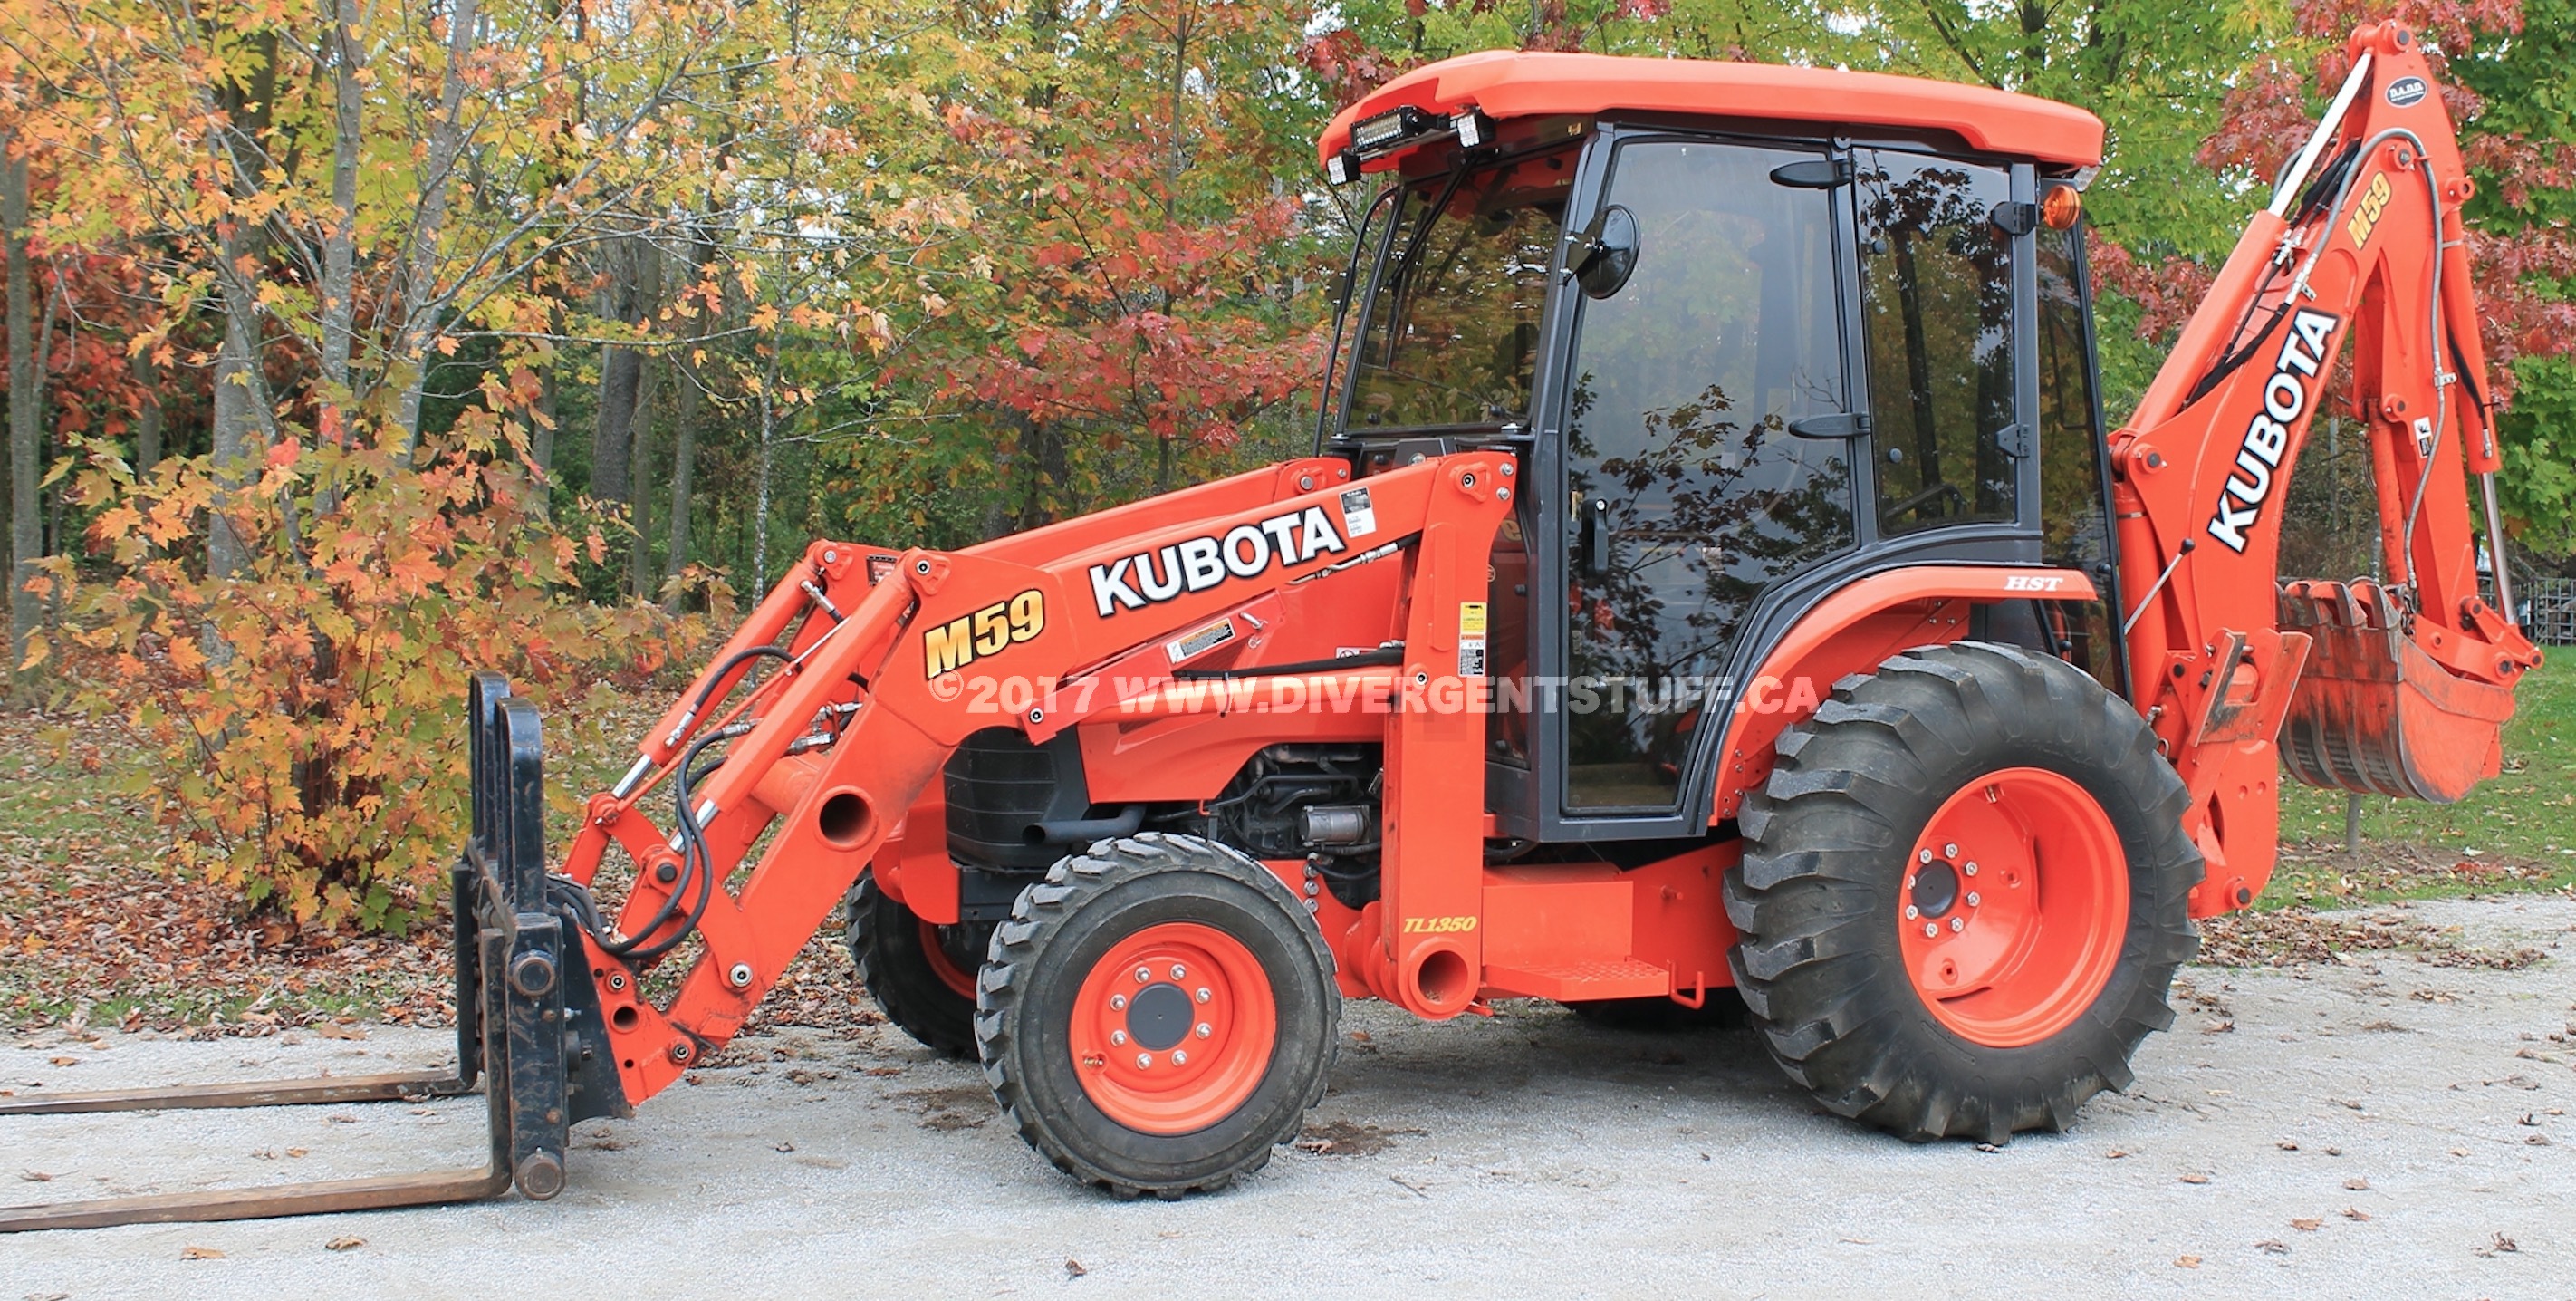
After 30+ years of using open station farm tractors for clearing snow I decided enough is enough.
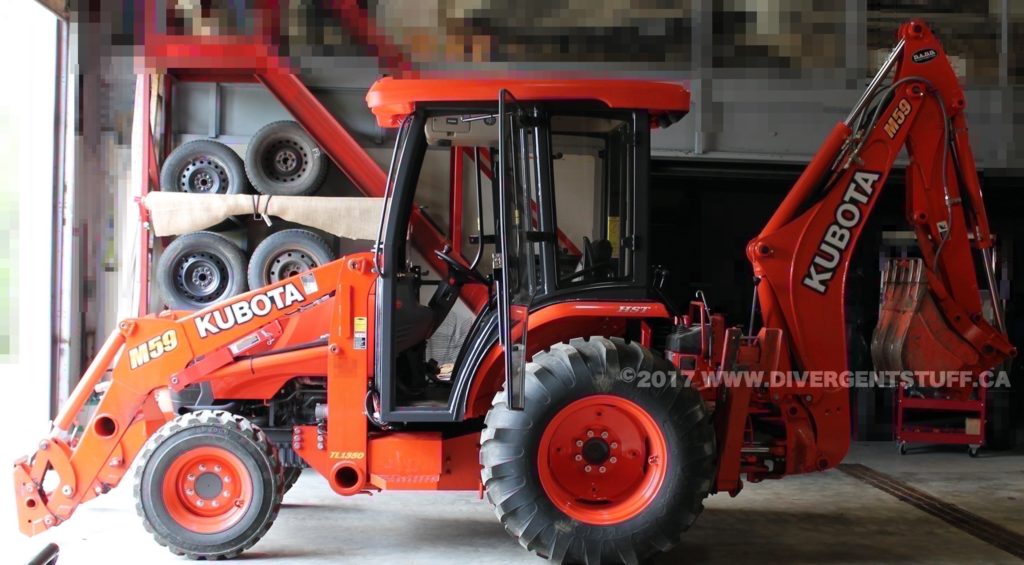
I finally bought a new Kubota M59 a couple years ago and I love it – except for the fact Kubota does not sell it with a factory cab option.
I shopped around and only found butt ugly cabs that were either soft vinyl sided or looked like they were stolen from a 1970’s tractor salvage yard.
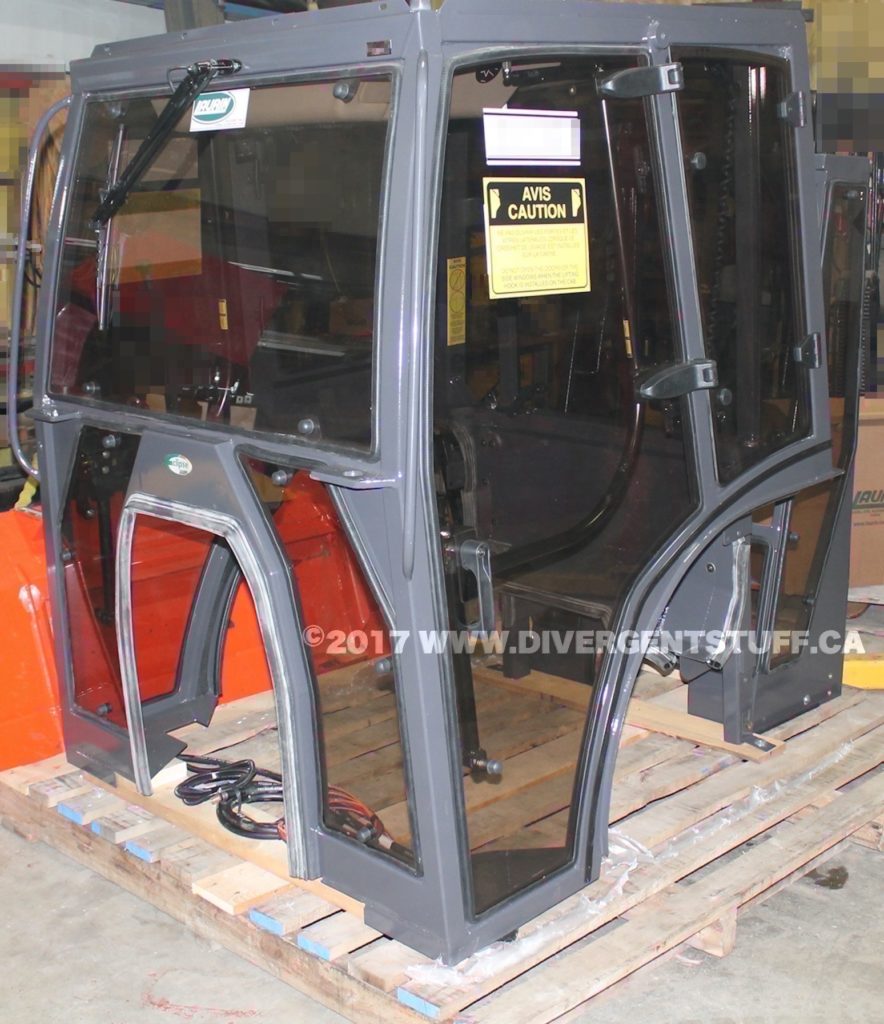
Then I found what looked like an OEM cab from Laurin Inc – their Eclipse EX cab.
http://www.laurin-inc.com/products/ID/266/Kubota-M59
I called my local Kubota dealer and got a quote of CDN$15K installed plus tax. I though no way in hell am I spending that on just a cab.
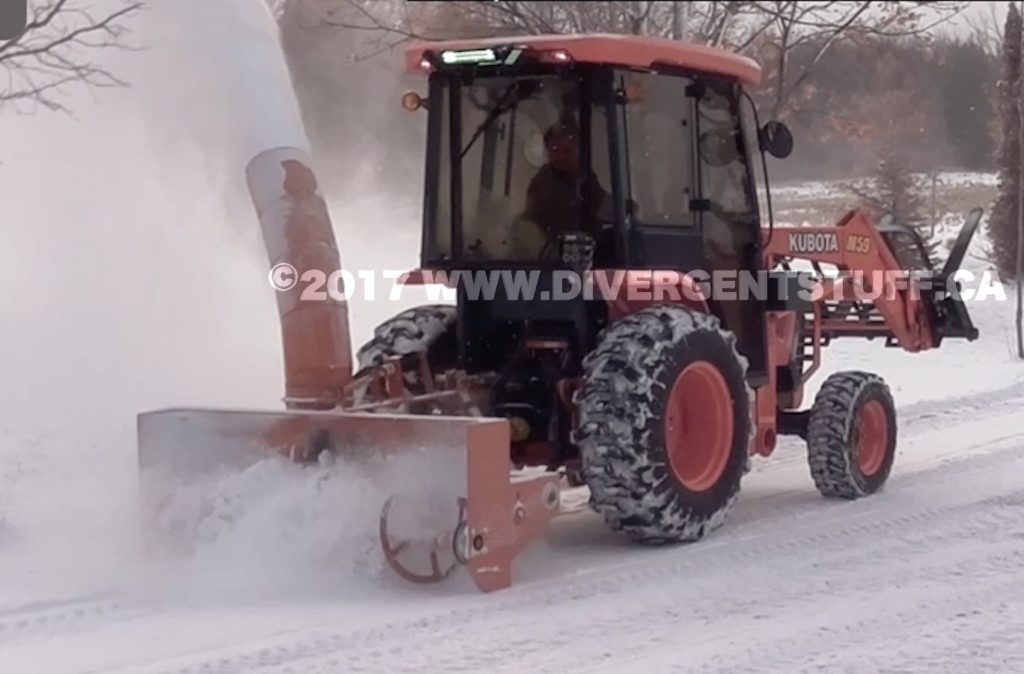
The previous 5 years winter had been pretty mild and I started getting soft. I use a six foot wide PTO driven snow blower mounted to the back of my tractor in winter. In my experience when you end up getting three or four feet of snow accumulation per season you absolutely need a snow blower. The negative of snow blowers is in some weather conditions the wind comes in every direction and you end up eating as much snow as you blow away. I dress warm in a full snow suit but still end up covered head to toe in snow, left soaking wet and shivering after 3-4 hours of cleaning my driveway and several neighbours driveways.
Last winter reminded me of how miserable winter could be. Normally I don’t run the snow blower unless we get over 4 inches of snow or the drifts are more than a foot deep in the driveway. For a couple of weeks after Christmas we were getting dumps of 6 inches to a foot of snow daily. I probably spent over 20 hours in two weeks just keeping up. Then one night my teenager was driving home from a evening work shift and got the car stuck in the middle of the road in two foot deep snow drifts. Where I live in the country snow plows sometimes only appear after 24 hours of heavy snow. So off I went on the tractor in -20oC half an hour drive each way just to tow him out.
When I finally got back home I decided I’m buying a cab for my new tractor.
Spring rolled around and I made calls. I then called the Laurin Inc factory and found out they had a 50 year anniversary sale on their cabs. I could buy direct and install it myself a lot cheaper than any local dealer was willing to sell me the cab only. I hemmed and hawed. Unfortunately Laurin Inc is based out of Montreal several hours drive away and I was having a tough time finding someone more local with a cab I could check out in person. Laurin was helpful and provided many photos of the actual M59 cab inside and out. I then placed the order and went to see my cab in person to make the final payment before shipping.
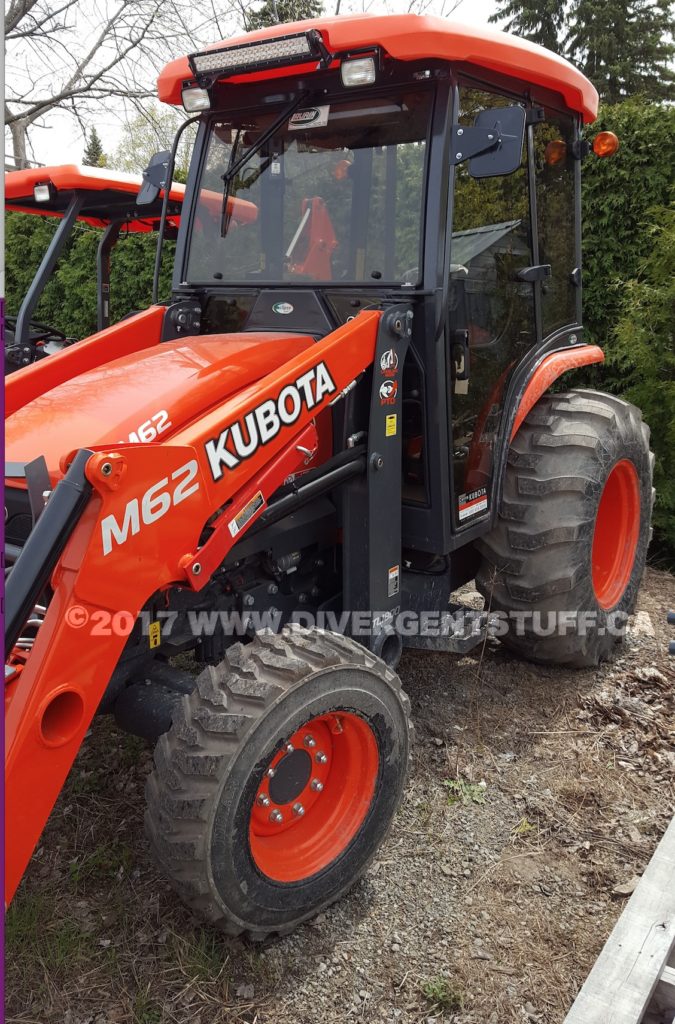

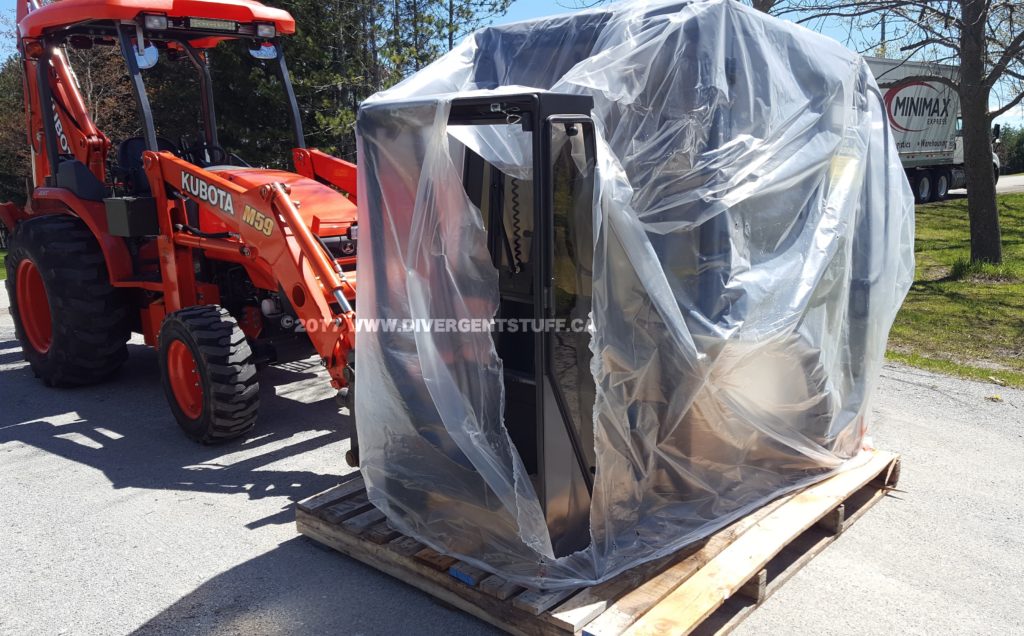
I got a factory tour of Laurin Inc and got to check out one of their cabs on a brand new Kubota M62. My cab was on a pallet and all ready to be shrink wrapped and shipped by truck.
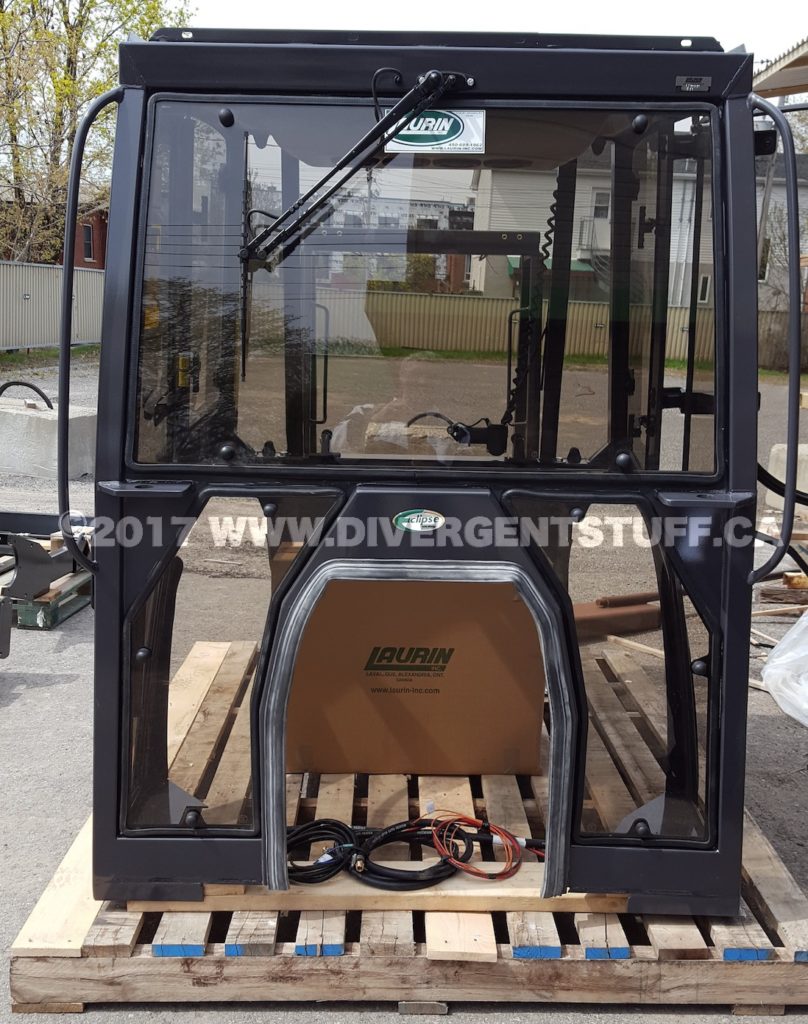
I was a happy camper and gave the go ahead. Two days the cab was delivered to my driveway all in one piece.8-)
Now the tricky part – read the instructions.
I will be honest and say that the included instructions could have been better. If you are not mechanically inclined I would NOT recommend doing this install yourself. The tractor dealer said it takes two men 2-3 days to install at shop rate of around $100/hr. Laurin told me 2-3 days to install. I chose a long weekend to do this install. It ended up taking me about 20 hours in total. I did need a helper for a couple of hours as a spotter while slinging the cab into place.
Some of the paper prints were fuzzy and hard to get details. I requested digital copies from the factory and they were quick to provide them by email. I will upload the digital copies for reference if anybody requests them.
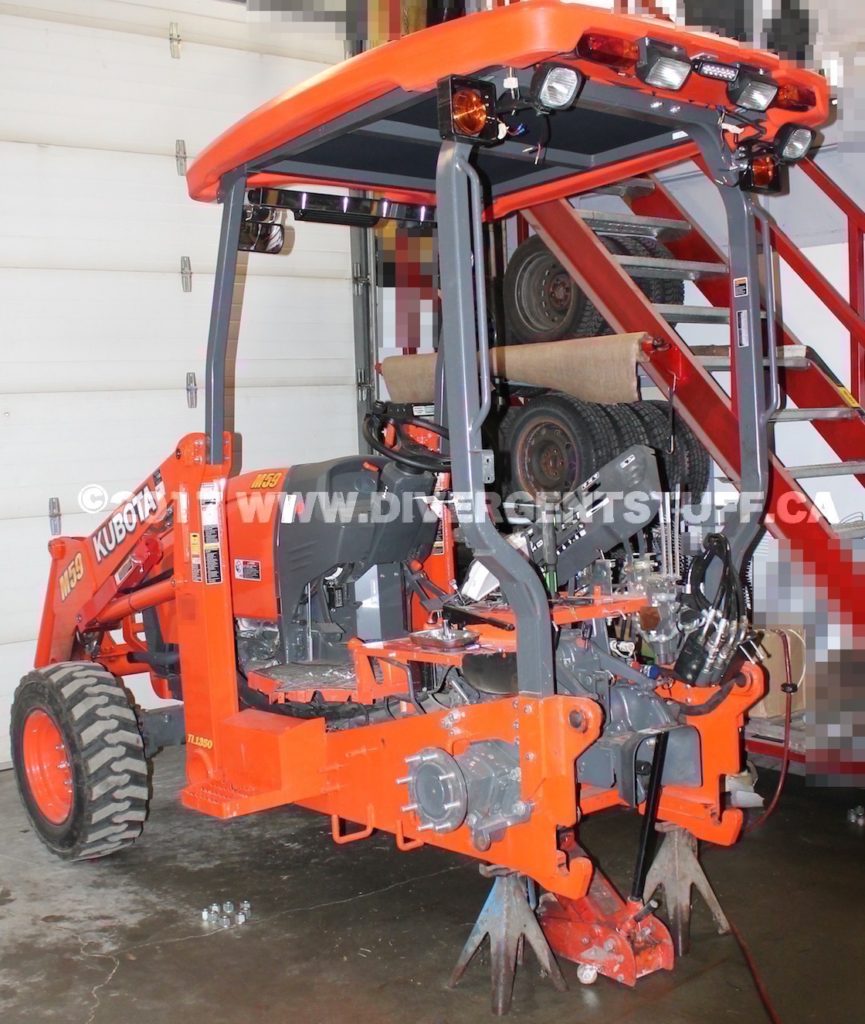
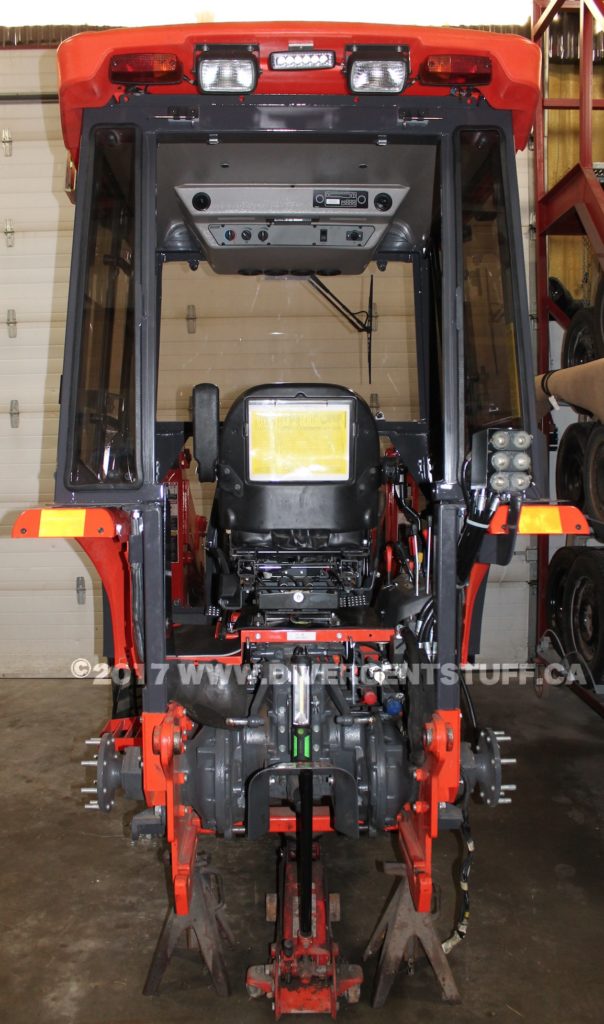
ROPS REMOVAL
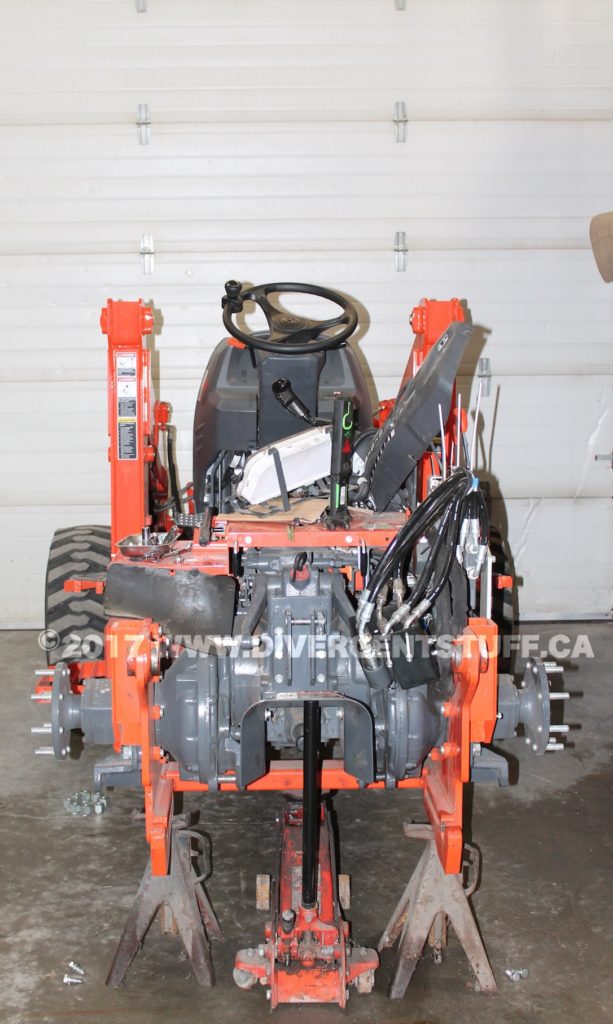
This part is pretty straight forward. As my tractor is only 1.5 years old at this point and always stored indoors things aren’t rusted into place. I pressure washed everything before starting in order to make assembly cleaner and easier. The worst part is that the fenders have to come off in order to remove the rear ROPS. This means that the back hoe and rear wheels have to come off the tractor along with the operator controls and instrument panel has to be disassembled too. Complete strip down took me about 8 hours.
CAB INSTALL
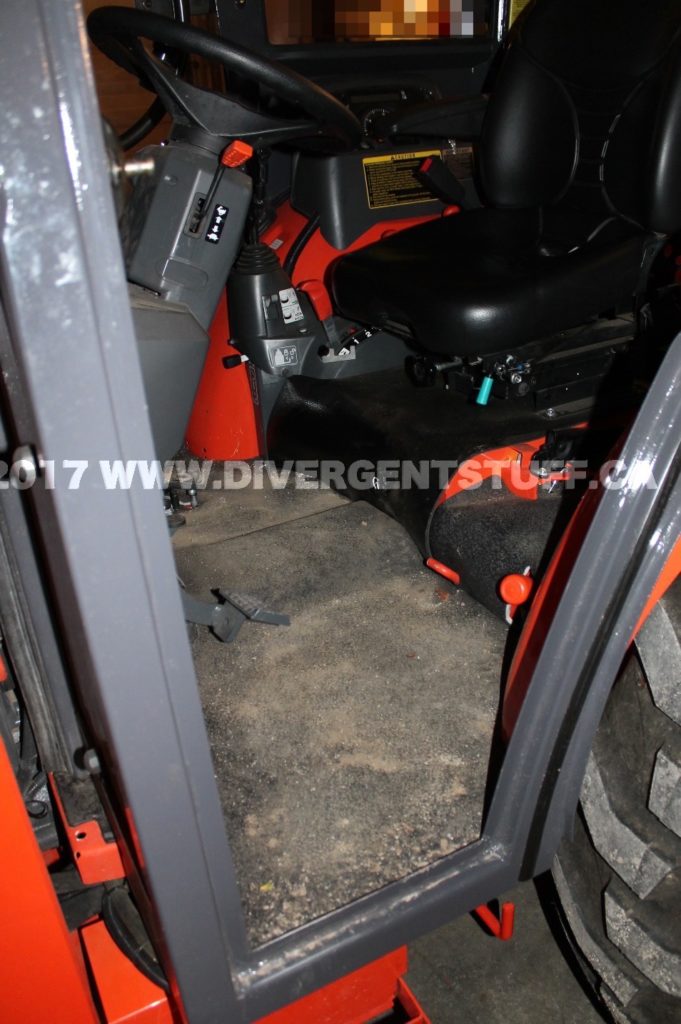
First step is to transfer the OEM plastic roof to the cab and feed my wiring through the rear ROPS column. One thing I was disappointed to find was that a Laurin employee used an acetylene torch to cut a hole through the roof panel into the column leaving a rough edge which is easy to cut yourself on and hard to feed cables through.
Note to Laurin: Please tell your guys to use a plasma cutter and a template for making this pass through or clean the rough edge cuts with a grinder after. With everything else looking professionally done this looks like a real hack job.
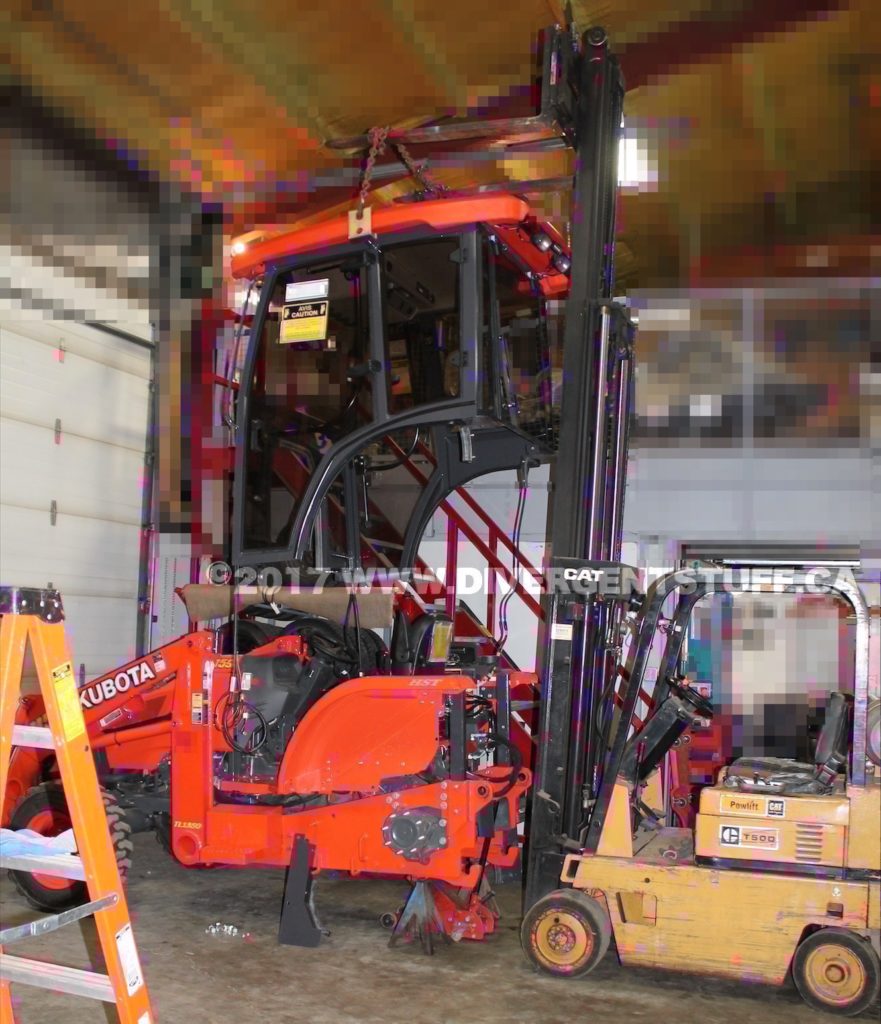
Next install the cab lifting bolts. The assembled cab weighs approximately 1,200 lbs so I used my forklift to sling it into place onto the chassis. My problem was I couldn’t find my short lifting slings and I ended up having to use a chain wrapped around the forks (I know, my bad but its Sunday morning and I want to be using the tractor again on Monday).
OOPS
Turns out I had to re-install the OEM rubber floor mat PRIOR to putting the cab in place. Oops. Time to unbolt the cab, lift it about 6 inches, re-install the floor mat, then lower the cab (Argh those rubber seals), then re-fasten the mounts. This was not made clear in the provided installation instructions.

Uh Oh…
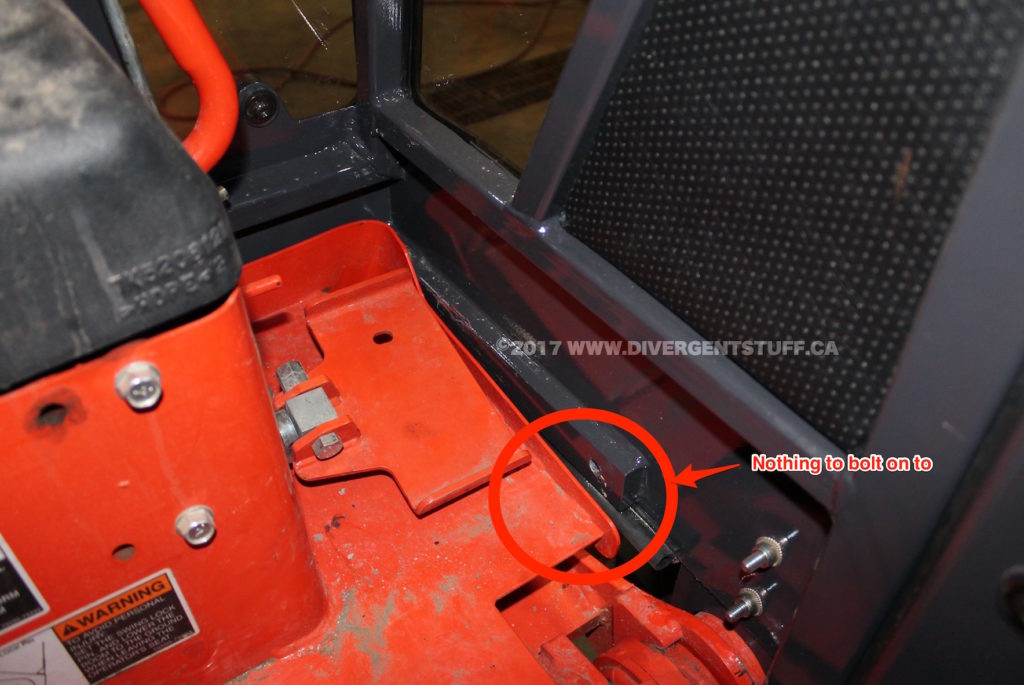
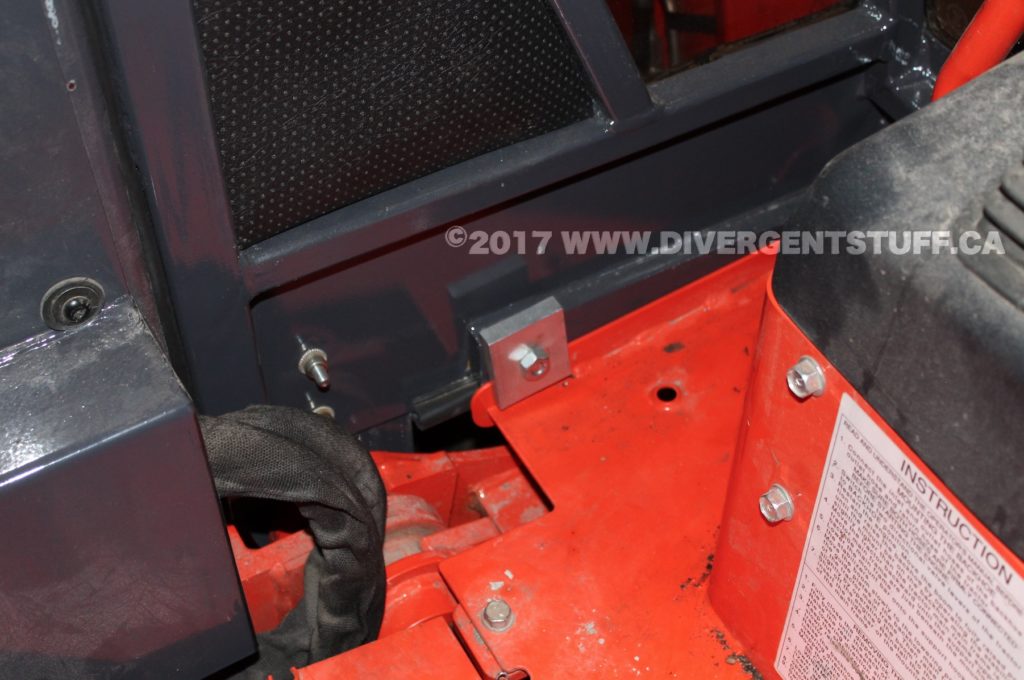
The rear ROPS come in two pieces. The bottom rear ROPS pieces come with pre-threaded holes and you are supposed to just bolt them on the the original ROPS supports. Problem here was only 3 out of 4 bolt holes were threaded and I had to tap the fourth hole myself. This was a Laurin factory oversight.
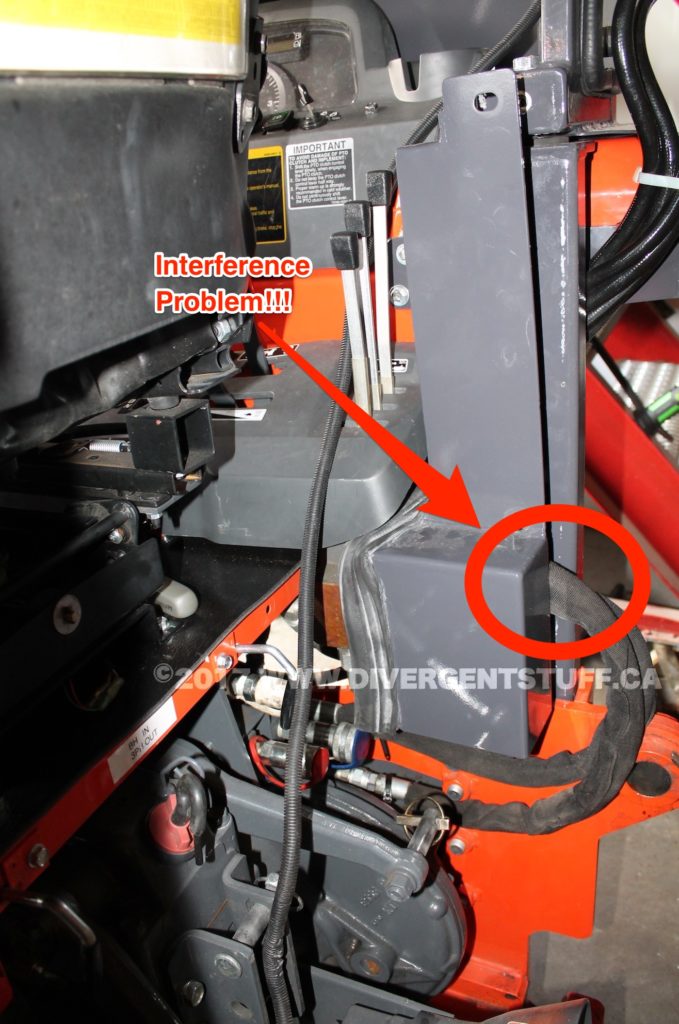
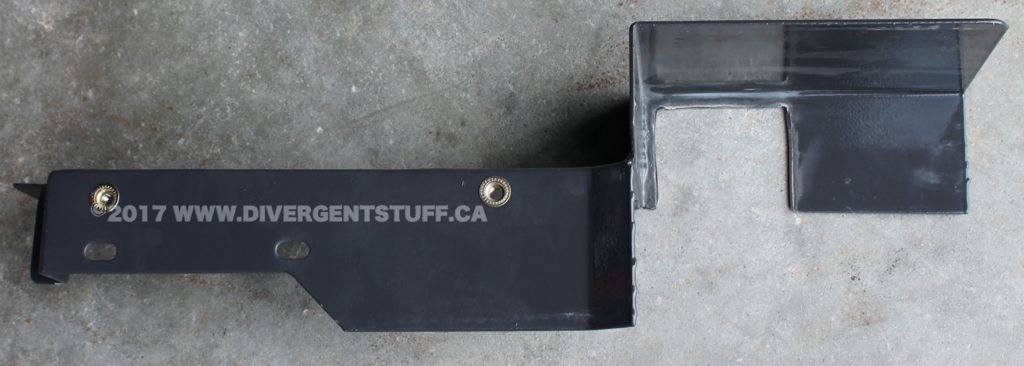
Cover panels had to be installed around the rear portion of the ROPS. Another problem I ran into was that the right hand side lower cover plate did not fit around the OEM hydraulic remotes. I don’t know if this is a Laurin factory oversight or did Kubota change the hydraulic remote hose routing on the 2015 model year. I had to plasma cut a pass through in order for the hydraulic hoses to fit. See the the attached photos.
GENTLE PERSUATION REQUIRED
Another gotcha was that the rear cab ROPS did not line up with the lower ROPS and could not be bolted together. The cab portion was “pinched in” a little too tightly and had to be manually spread apart to make the holes align enough to fit in the ROPS cab mounting bolts to the lower ROPS. My suggestion to Laurin would be to ship the cab with a spreader bar bolted in place to allow the cab to be located over the lower ROPS holes. Once the bolts are inserted the spreader bar could be removed and discarded.
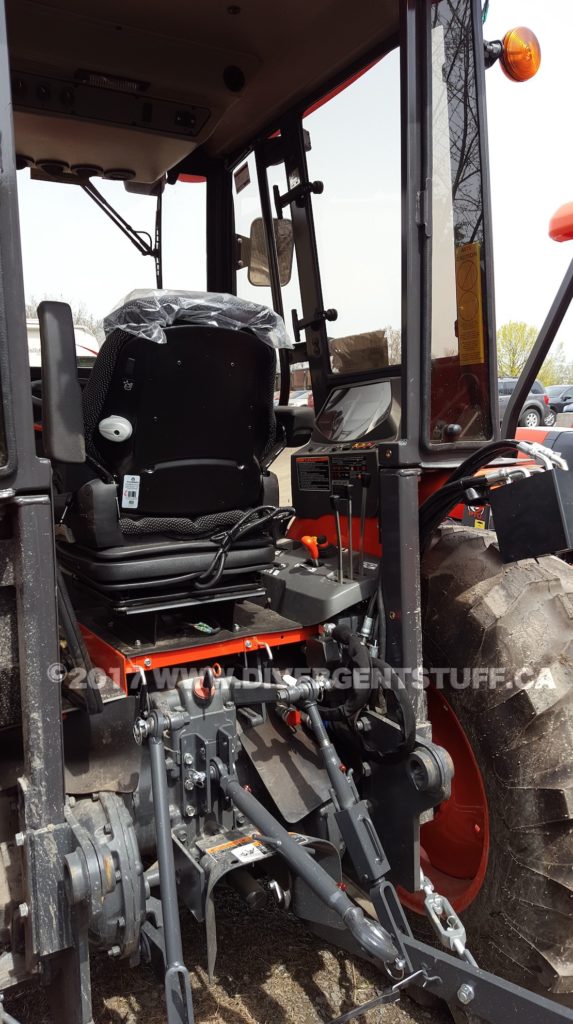
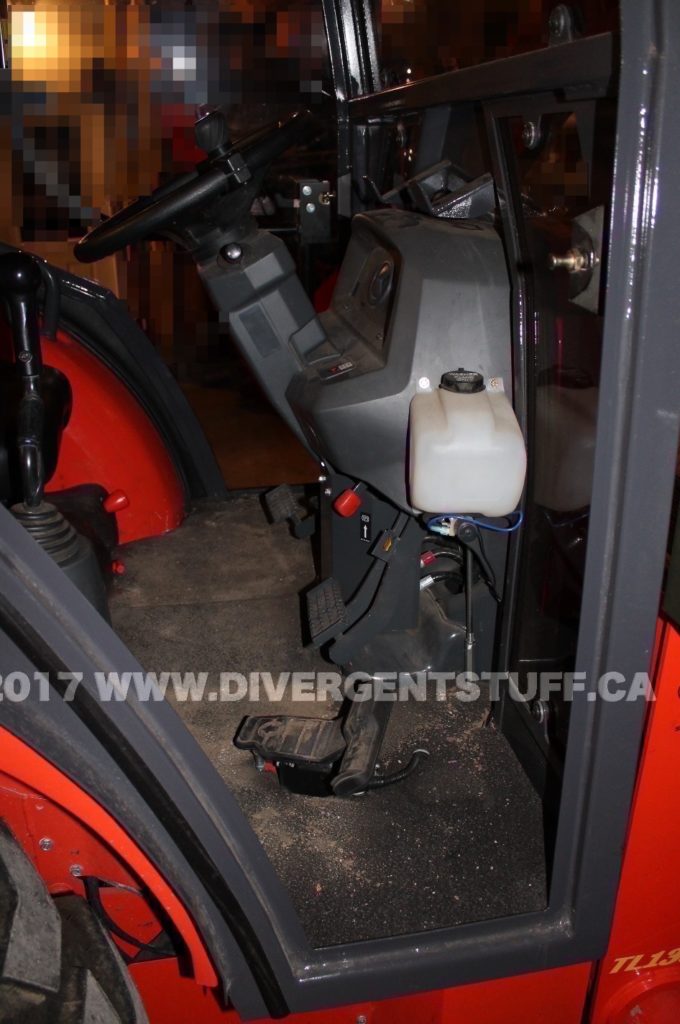
ELECTRICAL and PLUMBING
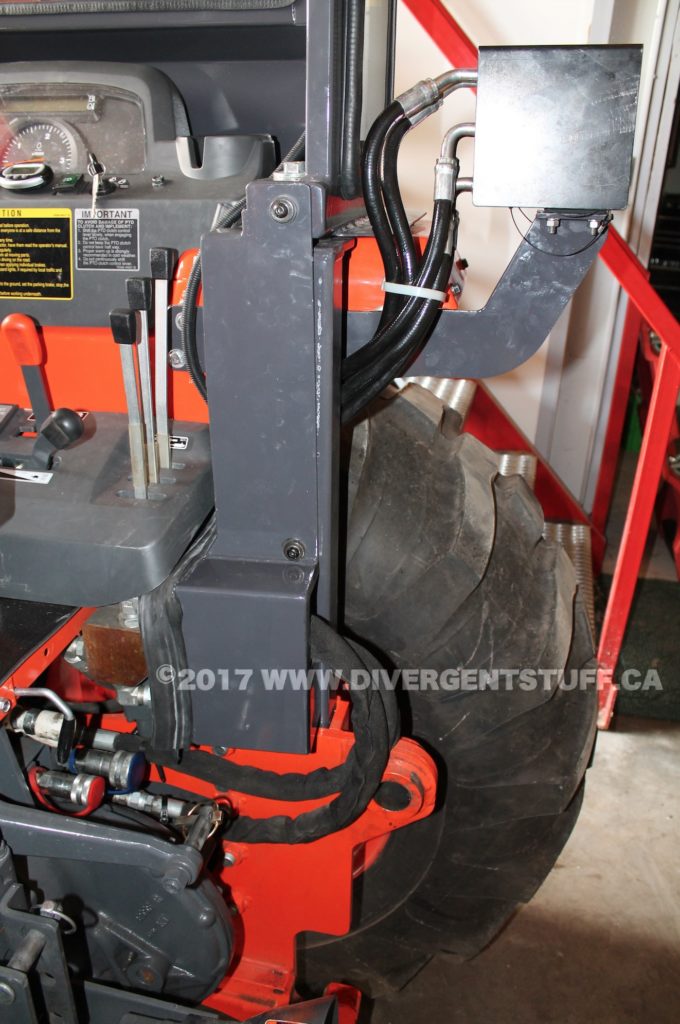
This part was fiddly and involved a lot of skinned knuckles trying to find the best routes for the electrical and heating hoses. Unfortunately the heater hoses are dropped down on either side of the front of the cab. The electrical wires are routed to the front left of the cab and conveniently come down to near the battery. On reflection it would have been easier to fasten the heater hoses to the cab before slinging into place. An even better solution would be for Laurin to route both heater hoses to the front right of the cab as I had to route the left one back to the right hand side to make it fit nicely. There are no instructions from Laurin on the best way to route the hoses or electrical. If I chose to route the left hose on the left hand side of the engine it would have been too close to the exhaust manifold and hot engine parts. Conveniently there was enough hose to route under the cab and over to the right hand side of the engine so I assume this was the better way to do it.


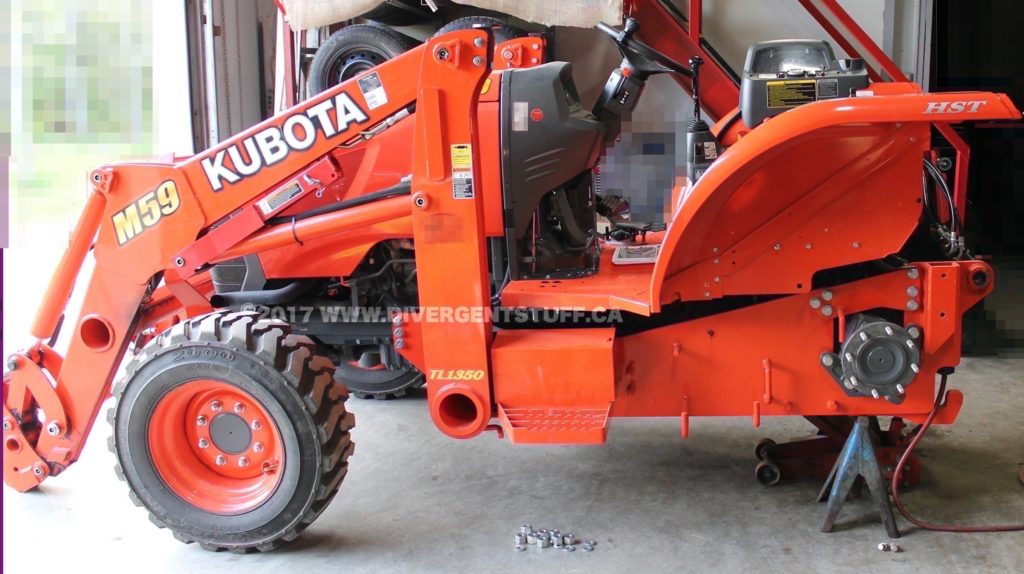
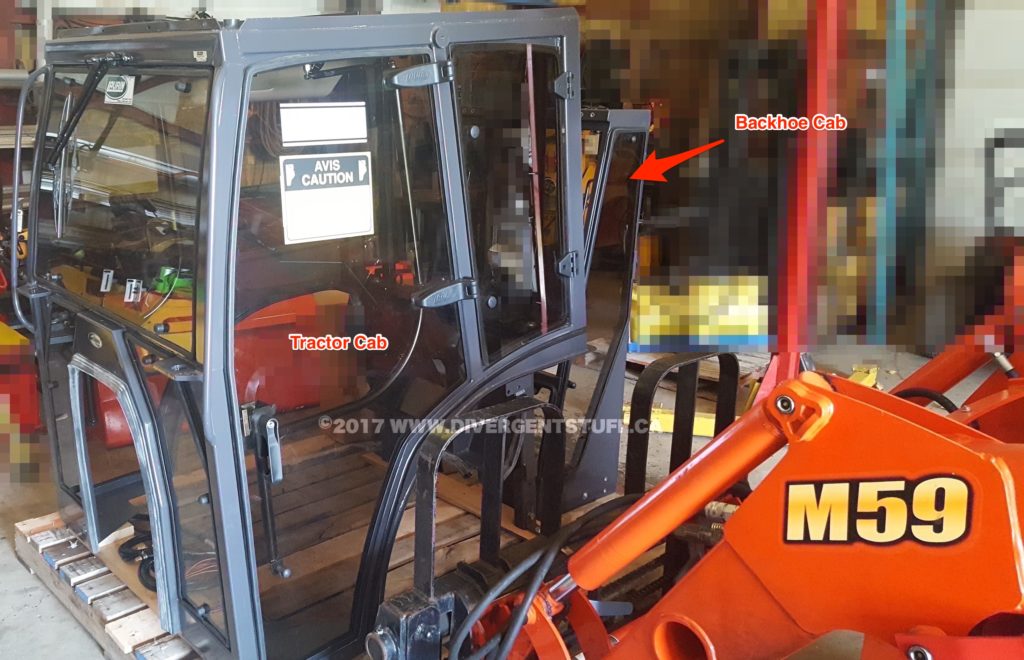
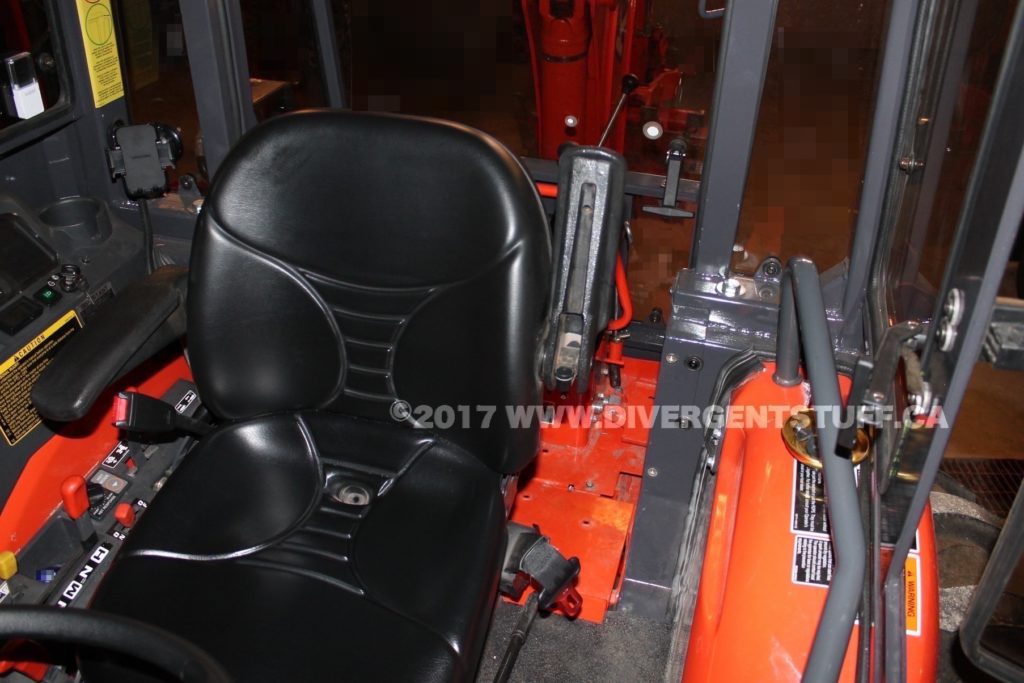
BACKHOE CAB INSTALL
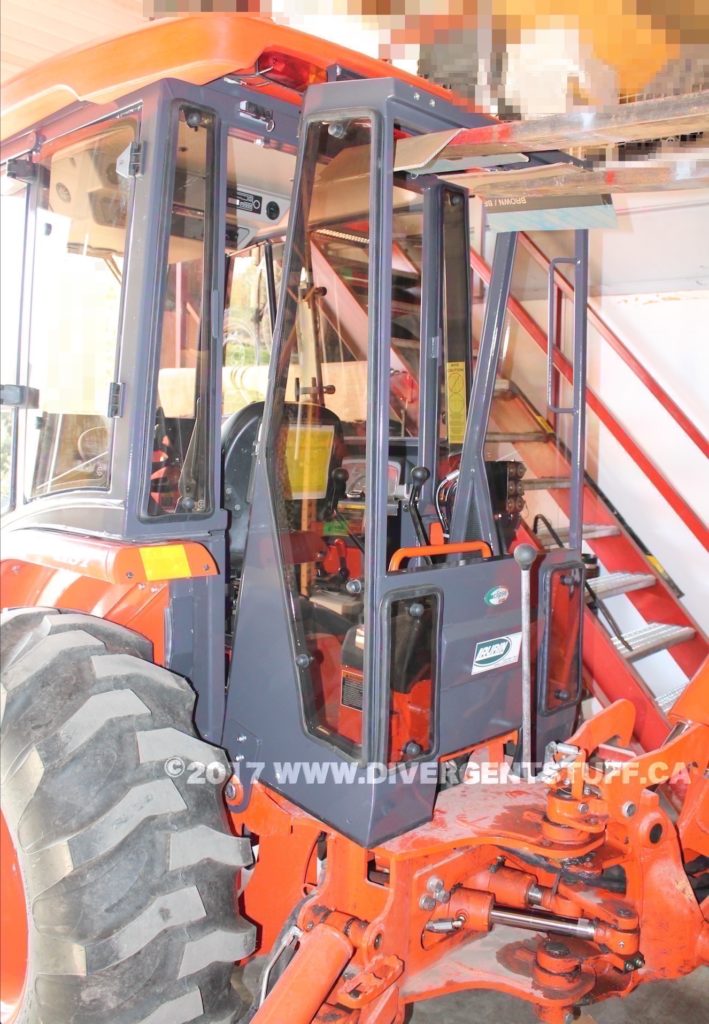
A nice feature on the Laurin cab is a mini-cab that is bolted onto the back hoe. The idea is if you remove the back hoe you can simply remove the rear window from the back hoe and install it on the tractor cab.
The problem I ran in to was that the backhoe cab did not properly fit the back hoe deck.
The back hoe had to be re-installed onto the M59, then the back hoe cab was to be installed and and mounted by drilling into the back hoe floor deck.
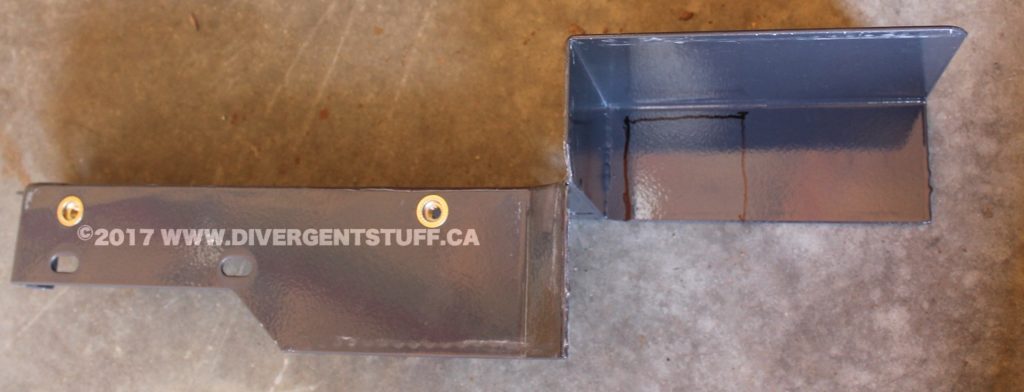
It looks to me that Kubota changed the back hoe decking a little bit and Laurin does not have the appropriate changes in their cab design. Laurin has holes pre-drilled in the skirt of the back hoe cab and users are expected to drill through back hoe floor deck for mounting. Only two out of the four holes provided had anything to drill into. I had to fabricate a special bracket to attach the cab to the back hoe floor deck. See the above photos for explanation.
FINISHING THE JOB
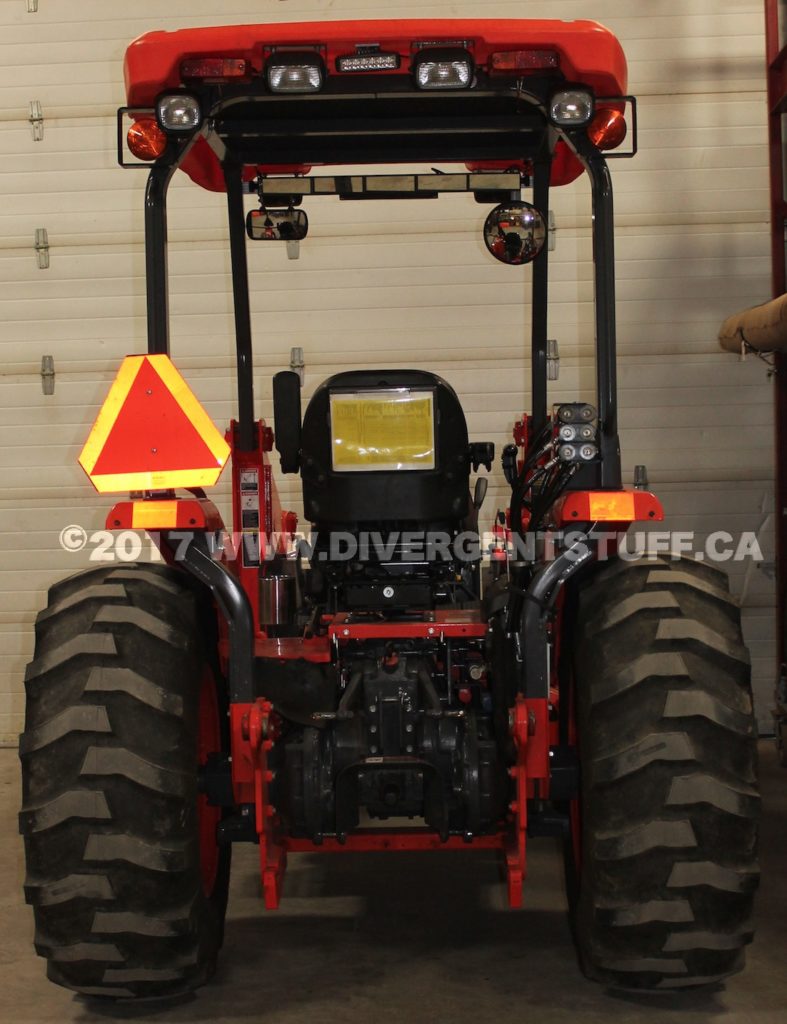
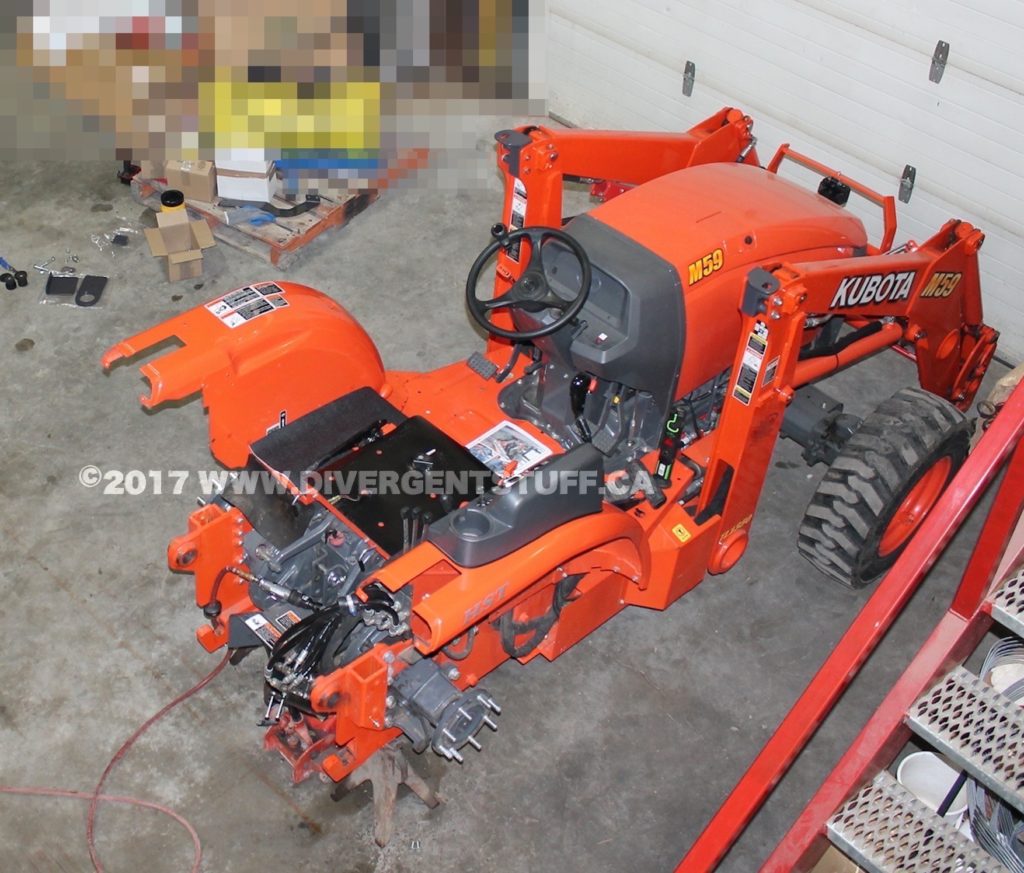
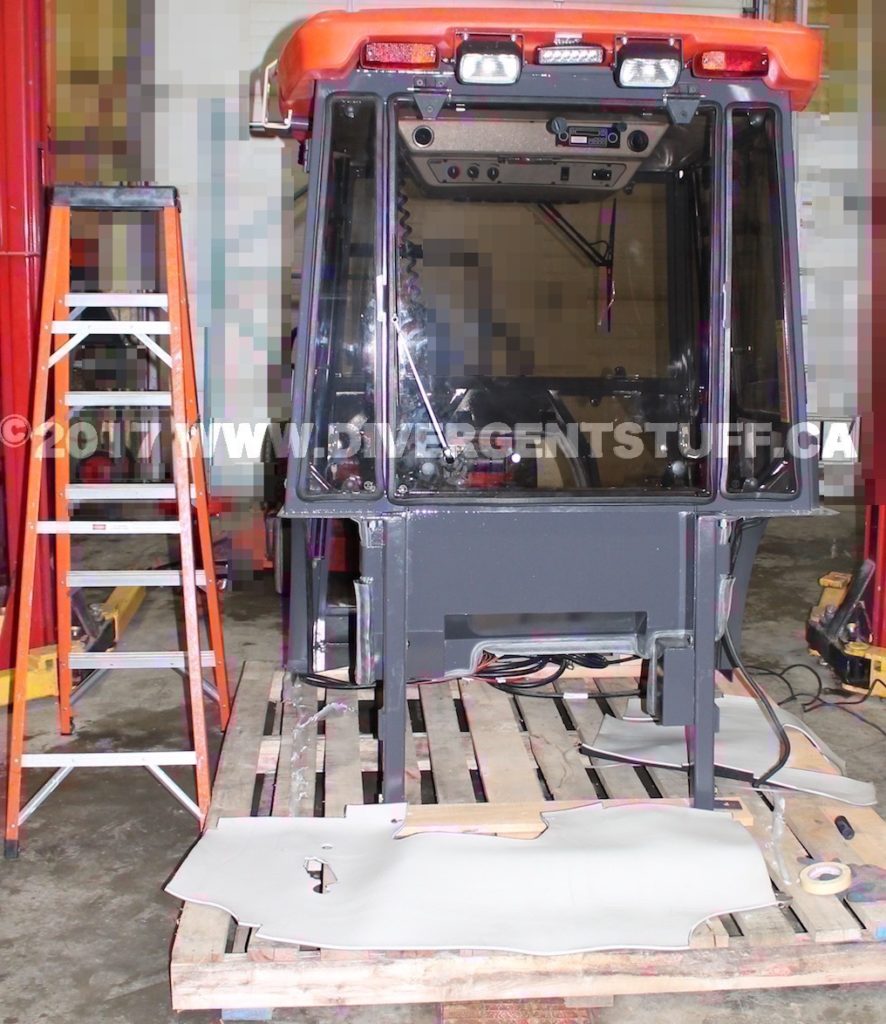
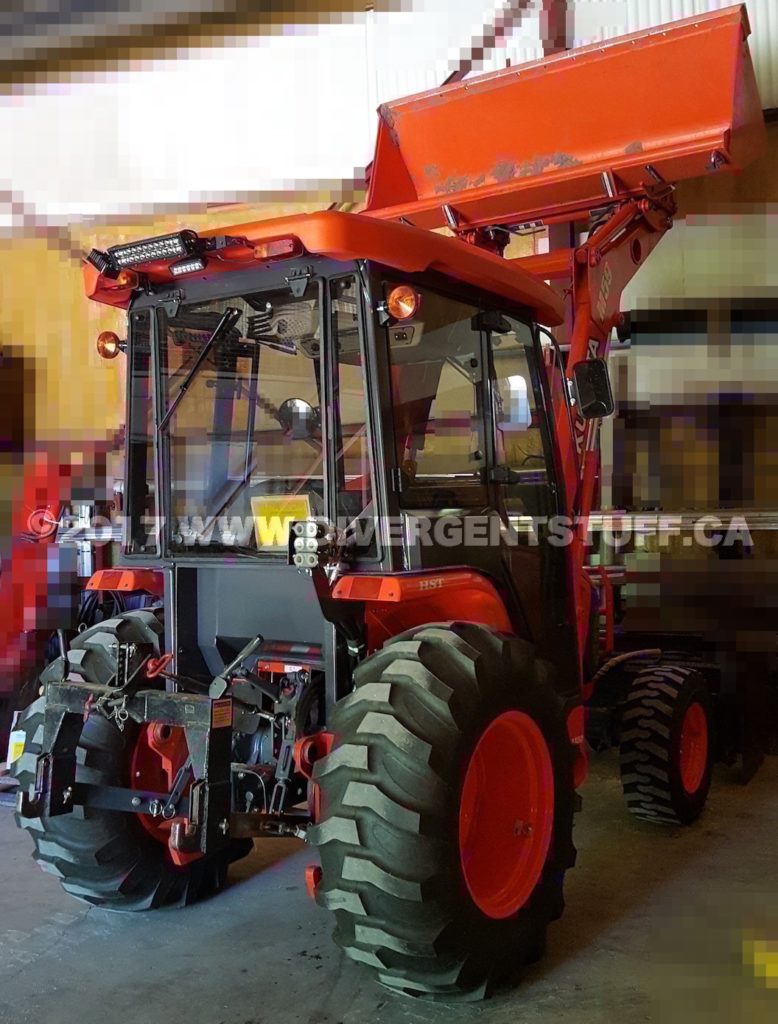
The last tasks were to finish installing the mirrors and factory roof lighting.
I don’t really like the Kubota OEM halogen lights as they consume a lot of power and give off relatively little light. Princess Auto had some really nice 14 inch 5200 lumen LED Light Bars on sale for $89.99/ea so I bought one of the front and one for the rear. I also swapped the corner lights for LED flood lamps. Lighting is now awesome for working in the dark and the LED set up is far superior to the OEM halogens.
I paid extra for the Laurin side mirrors and find them totally useless. I don’t like the way they clamp onto the handle bars as they feel cheap and bend inward easily. If you work around a lot of trees don’t buy these. I wish Laurin would have provided some professional extended mirrors like the Kubota, John Deere and New Holland tractors use. These should have proper brackets welded to the cab ROPS frame. I kept the mounting brackets and bought some 8″ convex round mirror from Princess Auto. These give me far superior vision compared to the flat mirrors provided.
Finally, the supplied brackets for mounting the four way hazard lights is really skimpy and flimsy. I’m expecting the hazard lights to get ripped off by tree branches any time soon.
SO HOW LONG DID IT TAKE ME?
I spent two 8 hour days from start to finish to get the structural part of the main cab installed. That includes lost time for when I forgot to install the carpet and had to remove the cab then reinstall it on my own. It also includes the time to modify the rear cover plates for the hydraulic hoses, make the rear ROPS fit up.
I spent another 2 hours to complete the lighting install, electrical wiring and heater hose routing.
Installing the backhoe cab took another 2 hours as I had to fabricate parts.
Total hours: 20 hours of my time plus 5 hours for a helper/spotter.
I Did not hook up heater lines yet…I assume another 2 hours to drain the coolant system, hook up lines, fill and burp coolant lines. Fingers cross I discover no leaks. I want to find some 3/8 NPT stainless steel ball valves for tapping into the cooling system as I want to be able to shut off the heater lines in the summer.
6 MONTHS LATER…
So far here are my observations…
The cab does make operating the tractor quieter. I can now operate the tractor for loader work without hearing protection. If I’m running the PTO or backhoe my Bose noise cancelling headphones are fantastic. I was originally considering buying a radio and speakers for the cab but for the same price I bought the headphones instead. Now I can listen to music at normal levels and even use the phone while I work.
The cab keeps me cleaner – keeping the windows closed and the fan on is a real treat. No more bugs, no more flying dust, no more getting smacked by tree branches and leaves…
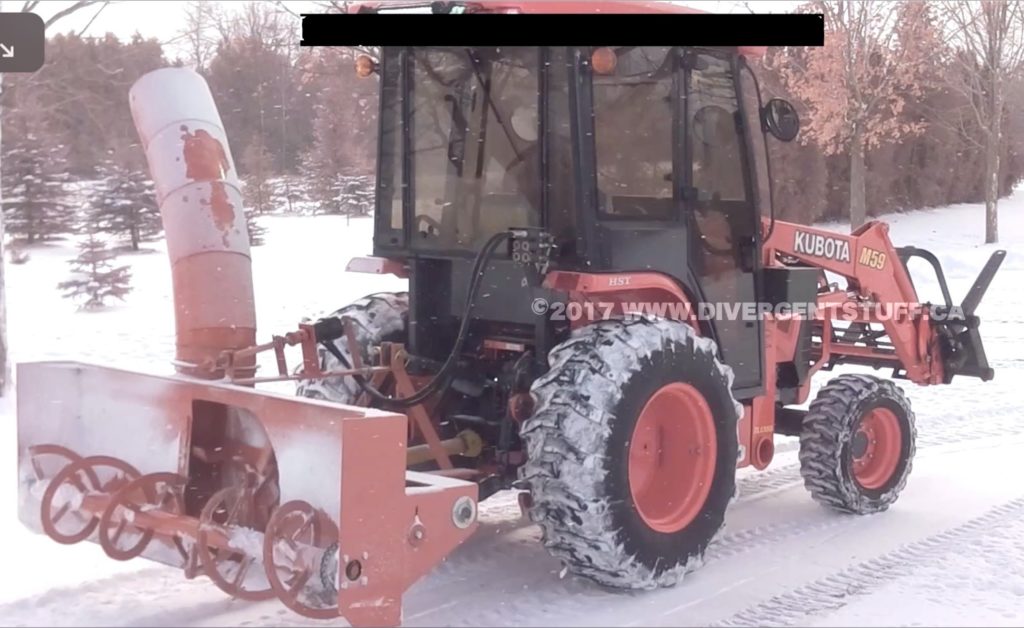
Handling and Loader Work. The cab provides an additional 1,200lbs of rear ballast and I find that loader work is much better bobtailing or running without the backhoe or 3 point hitch implements installed. With the backhoe installed I don’t use 4WD anymore when using the loader as I still get lots of push from the rear wheels. Visibility isn’t bad from the inside. The bottom of the front windshield ends at the top of the loader arms and for my six foot one height it sometimes gets in the way for visibility for grading work. The side and rear visibility is very good with and without the backhoe cab.
Hydraulic remotes. The mounting bracket is made out of flat bar and vibrates/flops back and forth. When the back hoe is on the steel smacks against the glass. I mounted a foam rubber strip on the side of the remotes to dampen the vibration. If it wasn’t such a PITA to pull apart I’d remove the bracket and weld some rod or flat bar to stiffen it up more.
Swapping the back hoe and the rear window. It takes me about half and hour each way. I don’t like the way the rear panels go on and off for the 3 point hitch. You need a screw gun and one of the screws in in a bad position and difficult to remove/install because the hydraulic remote valves are in the way. The rear window comes with quick release pins which sounded great at first. Then I realized Laurin only provided one set of hinges and one set of window latches and so I was expected to get the screw gun out each time, unbolt the hinges and latches, the re-bolt them onto the back hoe cab or tractor cab. For the price Laurin charges on the cab a second set should have been included free. I had to buy a second set to permenantly mount on the back hoe cab…then I had to modify the latches to accept the quick release pin.
Rain and wind are no longer a problem…
Hot weather….is brutal inside. I bought a thermometer to see how hot it gets. If I’m running the bush hog and its 25oC outside its 38oC inside with the windows closed. And I don’t even have the heater connected yet! No I’m not buying an A/C!
Cold weather? So far the coldest day has been 5oC and I can work outside in a shirt in a comfortable 18oC.
How is Laurin as a Vendor?
They’ve been responsive to all my questions in a timely manner. They’ve been open and friendly and even gave me a plant tour! I would be willing to buy from them again and would recommend them.
Bring on the snow!
In summary, this is a great aftermarket cab that looks like an OEM Kubota cab that Kubota should have provided with its M59/M62 line of tractor loader backhoes. You can view my thread on the TractorByteNet forums here http://www.tractorbynet.com/forums/showthread.php?t=387033&referrerid=168846
I will update this post after the winter season with long term comments. If you want to see more photos or have any questions send me an email.
Edit 2017-12-12
First Real Winter Test
Our first real snow fall occurred last night and we got about 4-6 inches of snow and temperatures are holding at -8oC or 17oF. Visibility, noise level and comfort in the cab is very good. I was in a light winter jacket and I was getting too warm. Within the first few minutes the cab was up to 60oF or about 16oC and I had to turn down the heater blower.

The front and side windows were relatively fog free and the rear window fogged up at the end below my shoulders. I will need to play around with the vents more to see what gives the best coverage. There are four vents by the front windshield and two small vents near the centre of the cab facing rearwards.
Front and rear wipers kept visibility good, however, something inside the cab is interfering with the wiper operation and I keep hearing load occasional “bangs” like something hitting the plastic inner cab roof liner on the inside. There’s enough vibration to pop one of the heater vents out of the holes and onto the floor. Follow-up: when I re-installed the ceiling liner from the heater install I missed a small metal tab that kept the plastic inner cab roof liner separated from the wiper mechanism. I had to drop the plastic liner and re-fasten it to fix the interference problem.
No leaks so far and I think I want to install a coat hook in the cab. I can probably get away with wearing just a vest or a sweater while operating the tractor. Funny part was when the wind changed direction and I cringed expecting to be force fed snow from all sides in a blizzard. Thats when I smiled realizing I was going to be warm and dry this winter.
Next time I clean snow I will bring my phone and snap some photos of the windows showing the fogging.

Edit 2017-11-06
The Heat is ON!
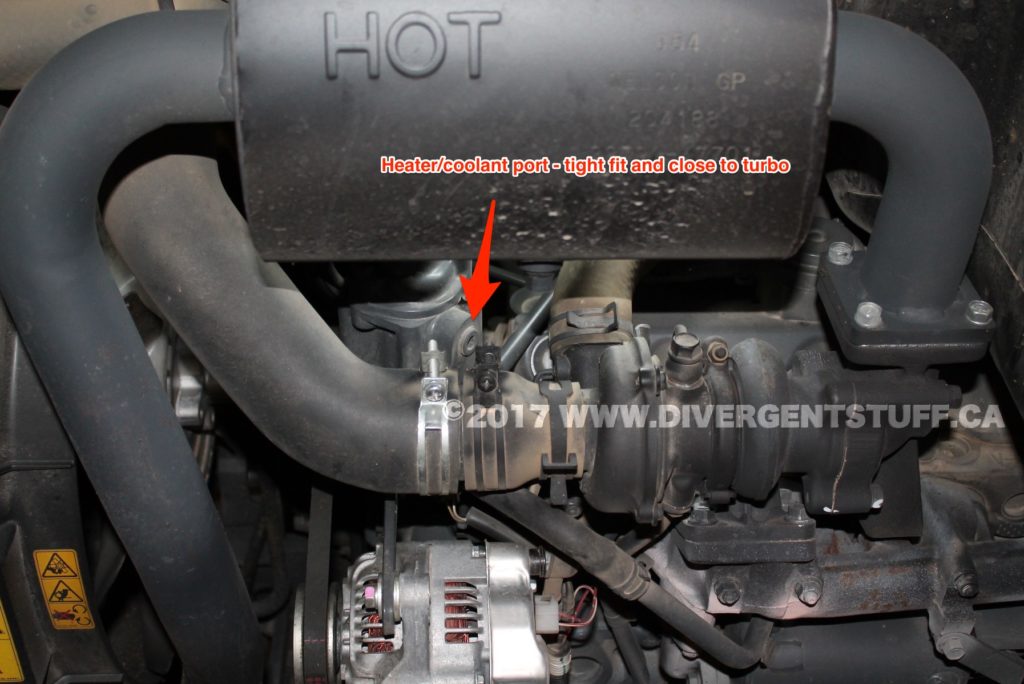
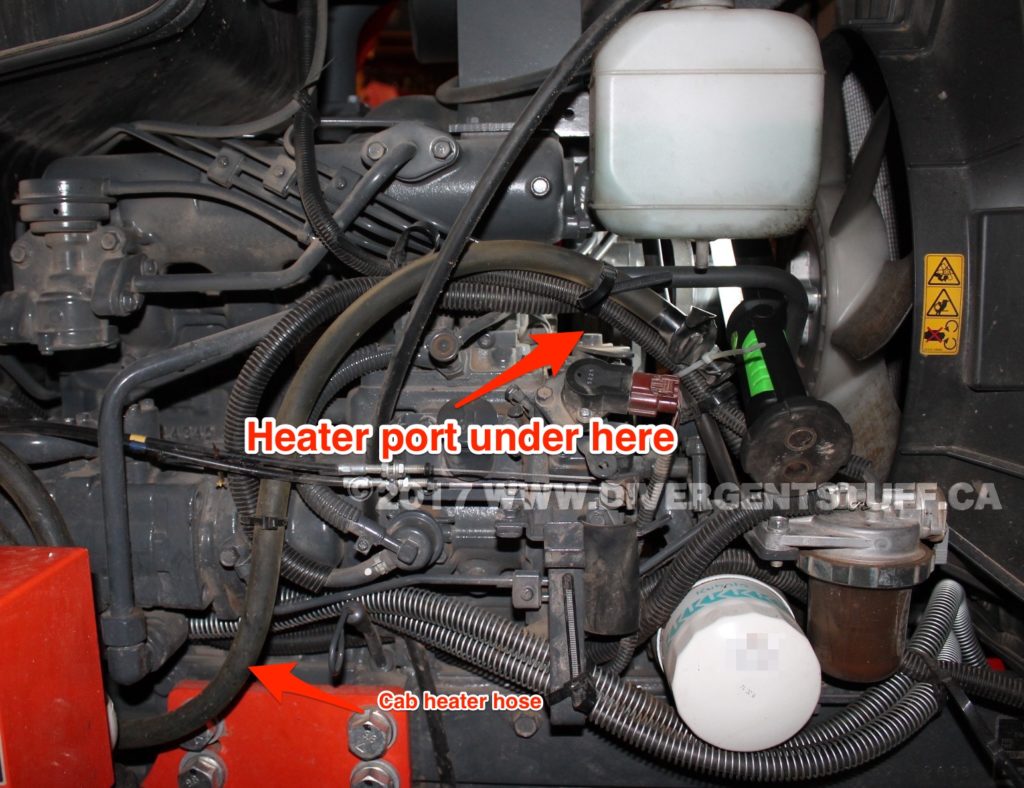
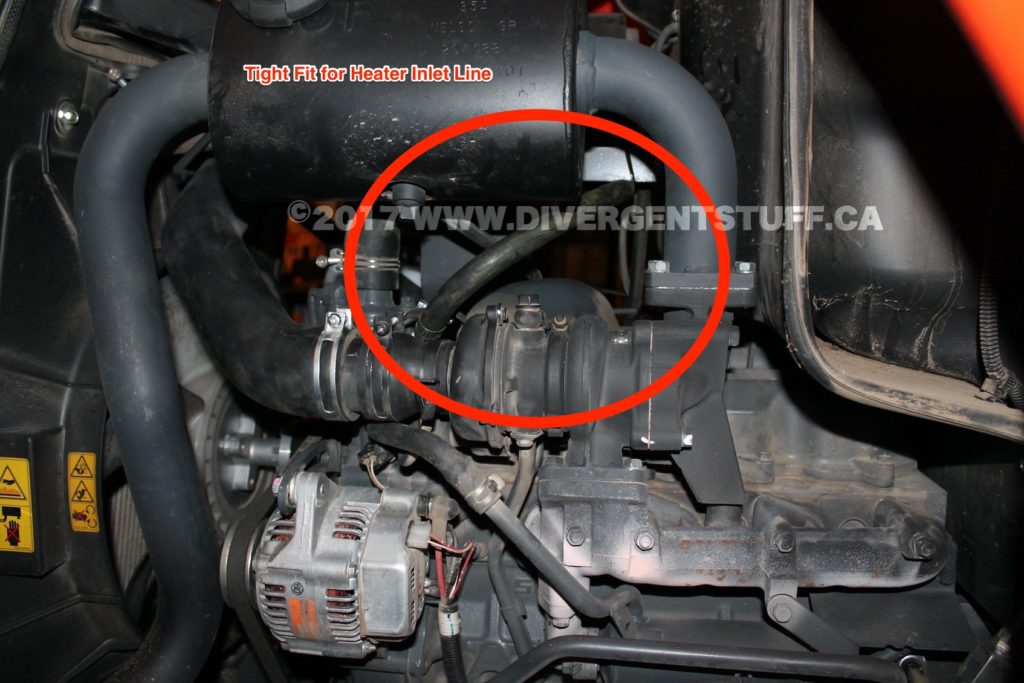
Our first snow flurries on Halloween day and hard frosty mornings made me think I should get the heater connected and tested before its too late. 3 hours, two skinned knuckles and a blue thumb nail later I got it done. It ended up taking me a little longer than expected because I had to disassemble the air intake system all the way to the turbocharger to allow me enough room to fit my hands and tools where they needed to be. You also need to remove the coolant reservoir for the install. To give you an idea of how tight it is I had to use an allen key L-wrench to remove the plugs and at best I could do a quarter turn of the wrench.
I originally thought of adding shut-off ball valves at the motor but there isn’t enough room.
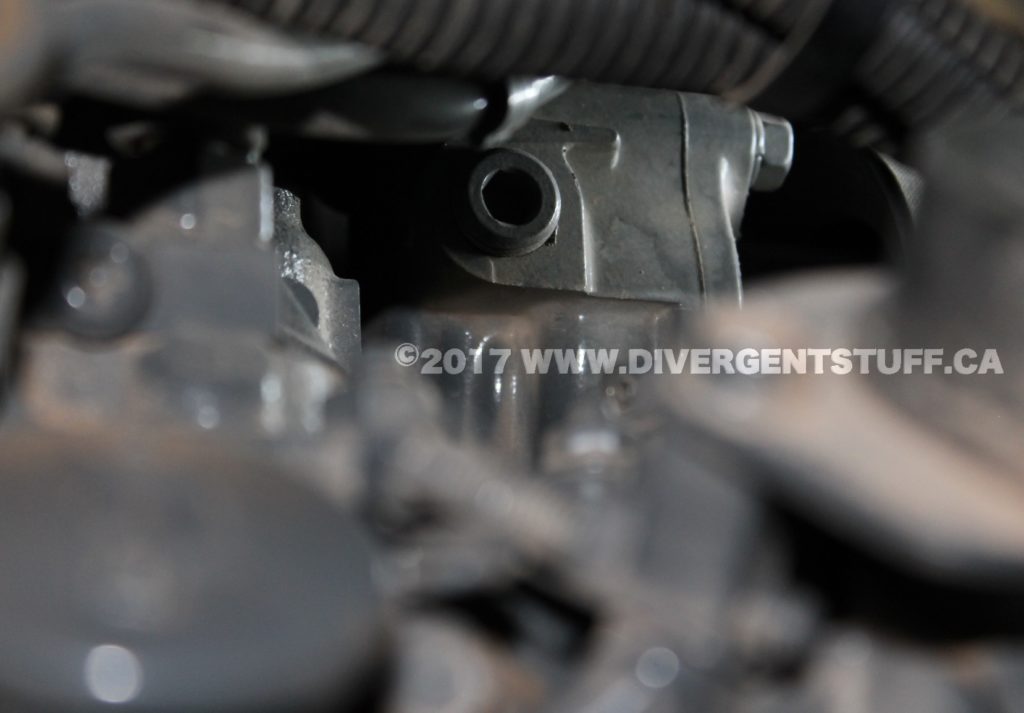
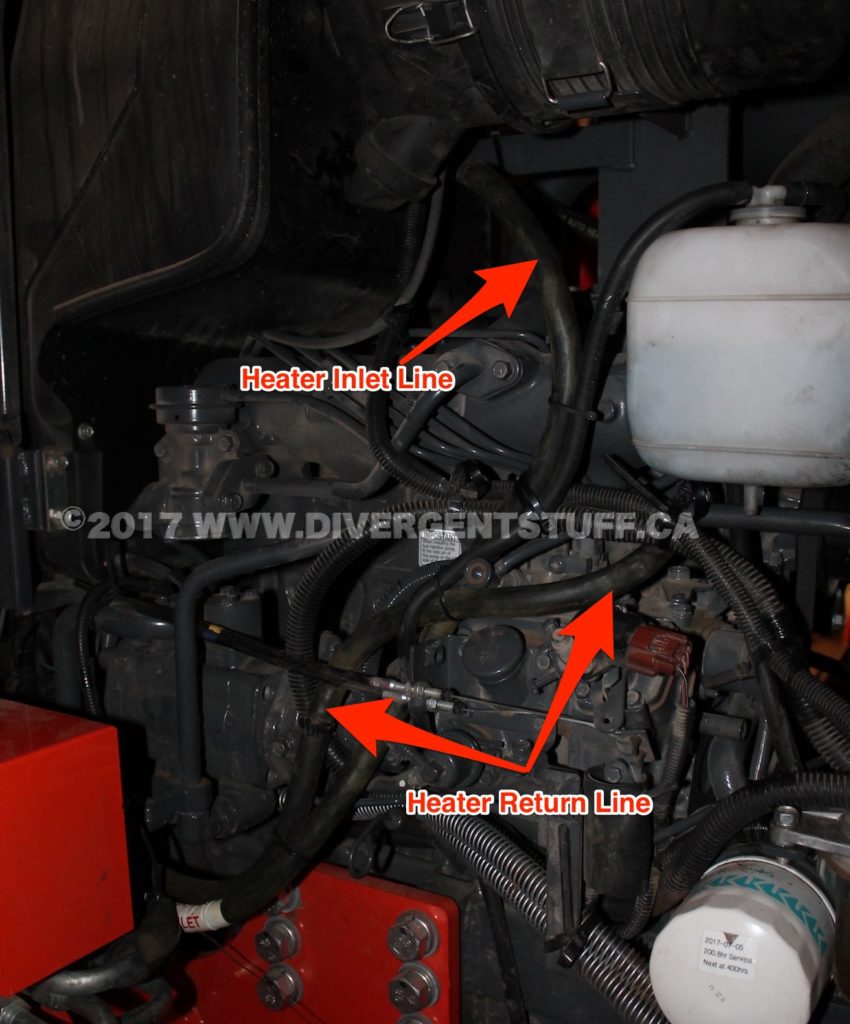
I used the Laurin supplied 45 degree elbow on the inlet side of the heater hose and its a pretty tight fit between the turbo and muffler. The elbow goes into a 3/8 NPT plugged port on the top of the water pump casing just below the thermostat. The supplied 1/2 inch I.D. water hoses are then connect by 3/8 NPT to hose barb brass fittings. The return line goes into the side of the water pump return into another 3/8 NPT plugged port. At least I hope those are the right spots!
Bleeding air out the system took a while because I had to run the engine until the thermostat kicked in. You have to disassemble the ceiling panel inside the cab to get access to a bleeder valve on the heater radiator core. Then I had to wait for the engine to cool down enough to thoroughly check for any leaks. So far so good.
I used tie straps to hold the heater lines in place. I had about two feet of excess inlet hose to cut off. Luckily the return hose was EXACTLY the right length.

The Laurin cab has a temperature control dial and proportional valve that lets me regulate the coolant flow into the heater core. I can also vary the fan speeds as required. I now have hot air on demand in the cab and four directional vents to vent my frustrations 😉
The one thing I learned from this experience is that Kubota now uses plastic radiators and no longer provide a stop cock to drain the radiator coolant. It’s now a plastic bolt that you have to unscrew and dump coolant everywhere like on the tractor frame and front axel because its a tight fit to get my oil pan under there to catch 7 Litres of coolant. For what Kubota charges for these tractors the design engineers could have splurged an extra $0.99 and put in a stop cock with a hose barb to catch the coolant. As an aside I don’t think design engineers should be allowed to design vehicles until they’ve been forced to work on them for a couple of years first.
Edit 2017-10-21
Suggestions to Laurin-Inc to make the cab even better:
1. Supply a removable fixture/angle bar that is bolted onto the rear cab where the lower ROPS attaches onto the cab. The idea of the fixture is to keep the cab portion at the correct location to make locating the bolts onto the lower ROPS easier. The cab is heavy and “C” shaped and lifting it causes the rear portion to bend in a bit at the bottom. The fixture will keep the cab from bending in at the bottom during the lifting and setting process.
2. Installation Instructions: Add a comment in the instructions about re-installing the Kubota OEM floor mat BEFORE the cab install.
3. Installation Instructions: Supply photos showing the important stages in installing the cab. Example – show WHERE the heater hose is best routed and photos of WHERE the ports are.
4. Installation Instructions: Provide some detail on installing the Laurin carpets – i.e. exactly which parts should be glued where?
5. Please supply a small quart of touch up paint with the kit. I found a dent/scratch on the inside door handle from the factory that I would like to touch up. I also scratched some sheet metal panels when removing/installing the backhoe.
6. Please re-think the location of the threaded inserts for installing the rear cab shields/sheet metal panels. The lower left screw is almost impossible to install if the user has the aux. hydraulic remote kit installed. I don’t have tiny hands and it’s impossible for me the hand thread that screw into place.
7. Consider using something like Nelson Weld Studs for mounting the rear cab shields/sheet metal panels or something with quick attach pins. It can be tricky locating the holes to screw in the panel and the position of the one hole by the hydraulic remotes makes it a prime candidate for cross threading as I have to use a power tool with a screw driver extension.
8. Add threaded inserts directly on the ROPS for mounting the turn signals/flashers on the cab instead of providing a flimsy bracket and having it mounted on the window bolts. I’m anticipating having one of the turn signals hit by a tree branch and the window glass shattering because of the bracket location.
9. If a user buys the backhoe cab kit please provide a set of hinge mounts and locking latched with the kit…in my opinion it doesn’t make sense to provide quick remove pins with the rear window and hinges and then fail to provide the mates on the backhoe cab. Users should NOT have to get power tools and unbolt things when removing the backhoe.
10. Make the front windshield openable like the back window – hinged at the top and swing out latches on the bottom.
11. Add a grab bar over the operator control panel as a bolt on option. I wish Kubota would do this as well.
12. Consider using a soft cab ceiling liner to aid in sound proofing the cab.
13. I strongly suggest making up a wiring harness and labelling your wires for the cab roof electrical. Currently it’s a rats nest of wires under the paneling – I discovered this when having to replace a defective windshield wiper switch. You can use a sheet of plywood in the factory with the harness all laid out with pin mounts. This will reduce wire scrap in the factory installs and reduce future potential problems for the customer.
5 COMMENTS
Do you have an electronic version of the cab installation (etc.) manual you could share ? I purchased a used 2017 M59 that came with Laurin Cab installed. I have not yet been able to locate any manuals for the cab online.
You are sort of in luck, the following is Laurin’s “Installation Instructions”
PDF Manual Part 1
PDF Manual Page 2
PDF Manual Page 3
PDF Manual Page 4
This may be helpful to someone in the future
Hi there. Thank you… Really enjoyed reading this page.
My brother recommended I would possibly like this blog. He was entirely right. This submit truly made my day. You can not consider just how a lot time I had spent for this information! Thanks!
Heya i’m for the first time here. I found this board and I find It really helpful & it helped me out much. I am hoping to provide one thing back and aid others like you helped me.